Software testing is an investigation conducted to provide stakeholders with information about the quality of the product or service under test. Testing your Android application is good to ensure the quality of your implementation. The Android testing framework, an integral part of the development environment, provides an architecture and powerful tools that help you test every aspect of your application at every level from unit to framework.
Android test suites are based on JUnit. You can use plain JUnit to test a class that doesn't call the Android API, or Android's JUnit extensions to test Android components.
The Android JUnit extensions provide component-specific test case classes. These classes provide helper methods for creating mock objects and methods that help you control the lifecycle of a component.Test suites are contained in test packages that are similar to main application packages, so you don't need to learn a new set of tools or techniques for designing and building tests.
The SDK tools for building and tests are available in Android Studio, and also in command-line form for use with other IDEs. These tools get information from the project of the application under test and use this information to automatically create the build files, manifest file, and directory structure for the test package.
The SDK also provides monkeyrunner, an API for testing devices with Python programs, and UI/Application Exerciser Monkey, a command-line tool for stress-testing UIs by sending pseudo-random events to a device.
The following diagram summarizes the testing framework:
You can create a test project anywhere in your file system, but the best approach is to add the test project so that its root directory tests/ is at the same level as the src/ directory of the main application's project. This helps you find the tests associated with an application. For example, in Myruns1 example, right click the java package and create a package called "tests". And we create a Java class in the test package.

The Android testing API is based on the JUnit API and extended with a instrumentation framework and Android-specific testing classes.You can use the JUnit Assert class to display test results. The assert methods compare values you expect from a test to the actual results and throw an exception if the comparison fails. Android also provides a class of assertions that extend the possible types of comparisons, and another class of assertions for testing the UI.
You must use Android's instrumented test runner InstrumentationTestRunner to run your test case classes. Individual tests are defined as any method beginning with 'test'. Here is an example:
import android.test.InstrumentationTestCase;

public class ProfileActivityTest extends InstrumentationTestCase {
    public void testExample() throws Exception {
        int expect = 1;
        int actual = 2;
        assertEquals(expect, actual);
    }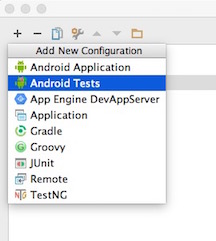
}First you need to set up the configurations by choosing "Run" -> "Edit Configurations". Then click the "+" button from the upper left corner to add an Android Tests configuration.
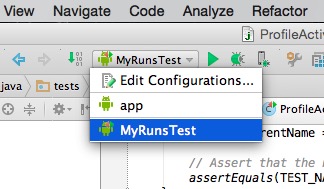
Type the name of the test, select the current module ("app") as the module, select the “All in Package” option and navigate to your “tests” folder you created. The config should look like this:

Apply the changes and close the dialog. You should now see your test cases as being a runnable project configuration in the bar across the top of your Android Studio instance.
Choose the test instance, then run it. You should see the failed test result because the expected value is different to the actual value.

Since we are testing an actvitity, first we need to extends the test class to ActivityInstrumentationTestCase2 and specify the class name that you want to test in constructor.
import android.test.ActivityInstrumentationTestCase2;
import edu.dartmouth.cs.myruns.ProfileActivity;

public class ProfileActivityTest extends ActivityInstrumentationTestCase2<ProfileActivity> {

    public ProfileActivityTest() {
        super(ProfileActivity.class);
    }
}
ActivityInstrumentationTestCase2 class provides functional testing of a single activity. The activity under test will be created using the system infrastructure (by calling InstrumentationTestCase.launchActivity()) and you will then be able to manipulate your Activity directly.
In Myruns1, it is able to save the user's inputs including name, email, phone etc.. Next, we will create a test to make sure that value of name is persisted across activity restarts.
Inorder to get the views in Profile activity, we need to import the R value.
import edu.dartmouth.cs.myruns.R;Then we create a test method in the test class. Again, all test methods must start with the “test” prefix, otherwise Android Studio will not detect them as tests and you will get errors.
We define the test name value that we want to add to the edit text.
final String TEST_NAME_VALUE = "test_name";We can launch the activity using getActivity(), and get the views in the XML file using the same way as in the activity class.
        // Launch the activity
        Activity activity = getActivity();

        // Get name edit text and save button
        final EditText text = (EditText) activity.findViewById(R.id.editName);
        final Button save = (Button) activity.findViewById(R.id.btnSave);
Then we need to set the name value to the edit text and click the save button. Since we are attempting to manipulate the UI, the execution must be performed on a UI thread.
        activity.runOnUiThread(new Runnable() {
            @Override
            public void run() {
                // Attempts to manipulate the UI must be performed on a UI thread.
                // Calling this outside runOnUiThread() will cause an exception.
                //
                // You could also use @UiThreadTest, but activity lifecycle methods
                // cannot be called if this annotation is used.
                text.requestFocus();
                //set the name to the edit text
                text.setText(TEST_NAME_VALUE);
                //click the save button
                save.performClick();
            }
        });
Calling .setText() or performClick() outside runOnUiThread() will cause an exception. Next we close the activity and relaunch it, get the name value from the name edit text, check if it is the same as the one we set before.
        // Close the activity
        activity.finish();
        setActivity(null);  // Required to force creation of a new activity

        // Relaunch the activity
        activity = this.getActivity();

        // Verify that the name was saved at the name edit text
        final EditText name2 = (EditText) activity.findViewById(R.id.editName);
        String currentName = name2.getText().toString();
        assertEquals(TEST_NAME_VALUE, currentName);
If your program is correct, you should see it passes the test. Otherwise you should verify the correctness of your implementation.

As mentioned in the topic of "[What to test] (http://developer.android.com/tools/testing/what_to_test.html)" on Android official website, testing the change in orientation is one of the important test should be consider. For devices that support multiple orientations, Android detects a change in orientation when the user turns the device so that the display is "landscape" (long edge is horizontal) instead of "portrait" (long edge is vertical).
When Android detects a change in orientation, its default behavior is to destroy and then re-start the foreground Activity. You should consider testing the following:
Is the screen re-drawn correctly? Any custom UI code you have should handle changes in the orientation? Does the application maintain its state? The Activity should not lose anything that the user has already entered into the UI. The application should not "forget" its place in the current transaction.
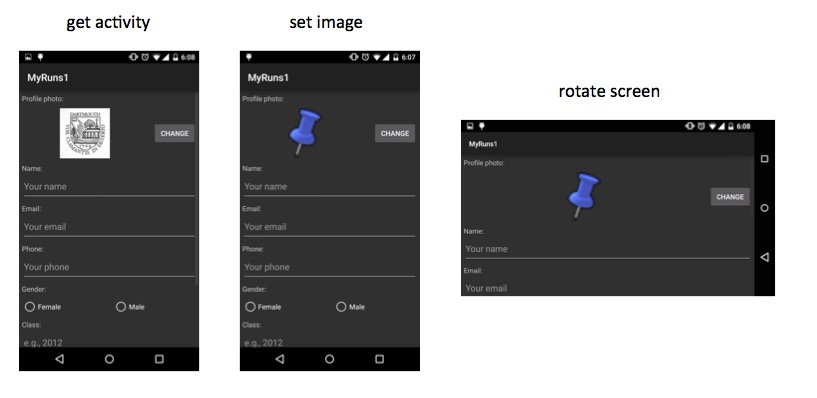
In Myruns1, we need to save the image temporarily inside onSaveInstanceState() when the screen roates thus the image is persisted after screen rotation. Now we test if such feature is implemented correctly.
In order to set a test image, we first start the activity, get an image from drawable folder and convert the bimap into byte array.
        // Launch the activity
        Activity activity = getActivity();

        // Define a test bitmap
        final Bitmap TEST_BITMAP = BitmapFactory.decodeResource(activity.getResources(),
                R.drawable.blue_pushpin);

        // Convert bitmap to byte array
        ByteArrayOutputStream bos = new ByteArrayOutputStream();
        TEST_BITMAP.compress(Bitmap.CompressFormat.PNG, 100, bos);
        final byte[] TEST_BITMAP_VALUE = bos.toByteArray();
Similarly to the name test, we set our test bitmap to the image view.
        final ImageView mImageView = (ImageView) activity.findViewById(R.id.imageProfile);
        activity.runOnUiThread(new Runnable() {
            @Override
            public void run() {
                //set the test bitmap to the image view
                mImageView.setImageBitmap(TEST_BITMAP);
            }
        });
We can set rotate the screen by using setRequestedOrientation(). However, it creates a new instance of the activity when we rotate the screen, thus we need to use Activity monitor to track the activity and update the current activity. Instrumentation.ActivityMonitor provides information about a particular kind of Intent that is being monitored. An instance of this class is added to the current instrumentation through addMonitor(Instrumentation.ActivityMonitor); after being added, when a new activity is being started the monitor will be checked and, if matching, its hit count updated and (optionally) the call stopped and a canned result returned.
The rotation test is required to open your phone screen, otherwise the test will be hanging.
        Instrumentation.ActivityMonitor monitor =
                new Instrumentation.ActivityMonitor(ProfileActivity.class.getName(), null, false);
        getInstrumentation().addMonitor(monitor);
        // Rotate the screen
        activity.setRequestedOrientation(ActivityInfo.SCREEN_ORIENTATION_LANDSCAPE);
        getInstrumentation().waitForIdleSync();
        // Updates current activity
        activity = getInstrumentation().waitForMonitor(monitor);
Now the "activity" variable is the rotated activity. You can find the bitmap value on the image view and compare it to our test bitmap.
        // Convert bitmap to byte array
        bos = new ByteArrayOutputStream();
        currentBitMap.compress(Bitmap.CompressFormat.PNG, 100, bos);
        byte[] currentBitmapValue = bos.toByteArray();

        // Check if these two bitmaps have the same byte values.
        // If the program executes correctly, they should be the same
        assertTrue(java.util.Arrays.equals(TEST_BITMAP_VALUE, currentBitmapValue));
You should see the following changes in your phone screen: