
Fragments can be used to respond to user input, varying form factors (phone or tablet) and other issues, such as, the orientation of the device. In portrait mode an app may show itself in a different manner to say landscape. The FragmentManager is responsible for adding, replacing, removing fragments dynamically. In this lecture, we will use the case study of the Fragment App to best understand how code can build dynamic layouts and respond to these types of events.
The Fragment app uses fragments in a number of different ways we
have not seen before. The goal of the app is simple: it presents the
user with a list of titles of some of Shakespeare's plays
(BTW, I was born 17 miles from the Bard's Stratford-Upon-Avon home, but
in a different century) as a list view. The user can tap on one of
these titles and get a snippet of the play's text.
The cool thing about the app is that it is responsive to real world events: for example, different form factor devices have the ability to lay out fragments differently; and the user might flip the orientation of the phone -- say from portrait to landscape to portrait. The Fragment app is adaptive to these two events: different device form factors and orientation.
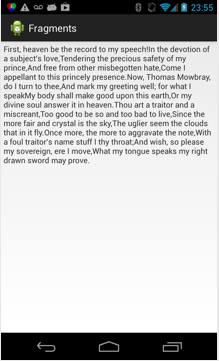
In portrait mode the screen renders a fragment for the titles and when one is selected it renders the details the screen -- in this case the title fragment is no longer visible, only the details (i.e., play's text) is in focus. That's because in the portrait only mode only a single fragment at time can be viewed at a time, as shown below.
That all changes if you flip the phone to the landscape mode when both fragments are drawn next to each other; that is, the user can view the title and detail fragments side by side, as shown below.
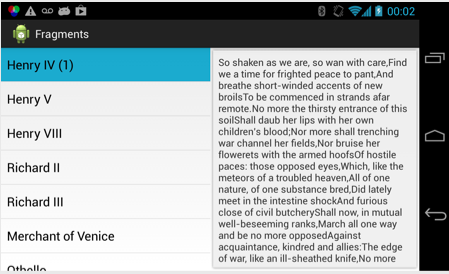
The cool thing about the landscape mode is that the two fragments are treated independently. The two fragments -- one for titles and one for details are instantiated and just added to the different modes of operation. The app is smart enough to remember which title you were looking at when modes are changed. This program would look great on a tablet where there is much more display real estate than a phone.
By reading the code you will see how different configurations of fragments are displayed, based on the screen configuration.
Like any project there are the usual files, but let me highlight some:
There are a number of requirements that the code has to address:
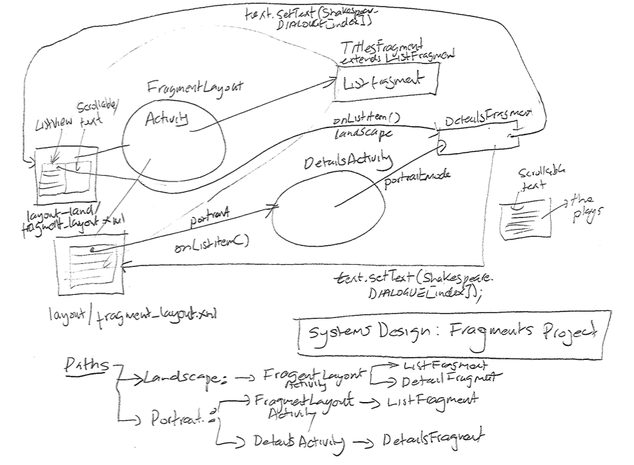
The app has a number of activities and fragments in its design as shown in the figure below. The FragmentLayout is the launched activity. The path through the activities and fragments and their wiring is different depending on if the phone is in portrait or landscap modes. If in portrait mode the design has two activities and two fragments. If in landscape mode the design as a single activity and two fragments. After reading these notes take a look at the code with the diagram as a map.
A fragment is usually used as part of an activity's user interface and contributes its own layout to the activity. A fragment is implemented as independent object -- independent of the activity that contains it. The benefit is that it can be used by multiple activities associated with the application. However, a given instance of a fragment is tied to the activity that contains it. Note, for example, TitlesFragment is contained inside a main activity Fragment Layout.
To provide a layout for a fragment, you must implement the onCreateView() callback method, which the Android system calls when it's time for the fragment to draw its layout. Your implementation of this method must return a View that is the root of your fragment's layout. We use ListFragment and in the code you will note there is no onCreateView() to draw the layout. That is because the default implementation returns a ListView from onCreateView(), so you don't need to implement it.
As mentioned before a fragment is a portion of the UI associated with an activity overall view hierarchy. In the fragment app example we add fragments to the activity layout in two different ways:
specifying a fragment in the XML file using
programmatically by adding the fragment to an existing ViewGroup.
First, let's look at the fragment_layout.xml file below. The class attribute in the
<?xml version="1.0" encoding="utf-8"?>
<FrameLayout xmlns:android="http://schemas.android.com/apk/res/android"
    android:layout_width="match_parent"
    android:layout_height="match_parent" >

    <fragment
        android:id="@+id/titles"
        android:layout_width="match_parent"
        android:layout_height="match_parent"
        class="edu.dartmouth.cs.FragmentLayout$TitlesFragment" />

</FrameLayout>
res/layout-land/fragment_layout.
In this case the first fragment in the horizontal layout (in landscape
on the phone) draws the titles fragment next to the details fragment,
as shown below.
<LinearLayout xmlns:android="http://schemas.android.com/apk/res/android"
    android:layout_width="match_parent"
    android:layout_height="match_parent"
    android:baselineAligned="false"
    android:orientation="horizontal" >

    <fragment
        android:id="@+id/titles"
        android:layout_width="0px"
        android:layout_height="match_parent"
        android:layout_weight="1"
        class="edu.dartmouth.cs.FragmentLayout$TitlesFragment" />

    <FrameLayout
        android:id="@+id/details"
        android:layout_width="0px"
        android:layout_height="match_parent"
        android:layout_weight="1"
        android:background="?android:attr/detailsElementBackground" />

</LinearLayout> public void onActivityCreated(Bundle savedInstanceState) {
super.onActivityCreated(savedInstanceState);
**snippet**
if (mDualPane) {
// In dual-pane mode, the list view highlights the selected item.
getListView().setChoiceMode(ListView.CHOICE_MODE_SINGLE);
// Make sure our UI is in the correct state.
showDetails(mCurCheckPosition);
} else {public class FragmentLayout extends Activity {
@Override
protected void onCreate(Bundle savedInstanceState) {
super.onCreate(savedInstanceState);
// root view inflated
setContentView(R.layout.fragment_layout);
}layout-port or layout-land directory first, if it's not found then it falls back to the default layout directory. All the layout files are off res/layout. Typically the following conversion is followed:
fragment_layout. This view is
placed directly into the activity's view hierarchy. It can itself be a
complex view hierarchy. When In the user clicks on one the items in the
ListFragment then onListItemClick() callback is called which in turn
calls the showDetails(position) to will start
@Override
public void onListItemClick(ListView l, View v, int position, long id) {
        Toast.makeText(getActivity(),"onListItemClick position is" + position, Toast.LENGTH_LONG).show();
                    showDetails(position);
} public static class TitlesFragment extends ListFragment {
boolean mDualPane;
int mCurCheckPosition = 0;
// onActivityCreated() is called when the activity's onCreate() method
// has returned.
@Override
public void onActivityCreated(Bundle savedInstanceState) {
super.onActivityCreated(savedInstanceState);
// You can use getActivity(), which returns the activity associated
// with a fragment.
// The activity is a context (since Activity extends Context) .
Toast.makeText(getActivity(), "TitlesFragment:onActivityCreated",
Toast.LENGTH_LONG).show();
// Populate list with our static array of titles in list in the
// Shakespeare class
setListAdapter(new ArrayAdapter<String>(getActivity(),
android.R.layout.simple_list_item_activated_1,
Shakespeare.TITLES));
// Check to see if we have a frame in which to embed the details
// fragment directly in the containing UI.
// R.id.details relates to the res/layout-land/fragment_layout.xml
// This is first created when the phone is switched to landscape
// mode
View detailsFrame = getActivity().findViewById(R.id.details);
Toast.makeText(getActivity(), "detailsFrame " + detailsFrame,
Toast.LENGTH_LONG).show();
// Check that a view exists and is visible
// A view is visible (0) on the screen; the default value.
// It can also be invisible and hidden, as if the view had not been
// added.
//
mDualPane = detailsFrame != null
&& detailsFrame.getVisibility() == View.VISIBLE;
Toast.makeText(getActivity(), "mDualPane " + mDualPane,
Toast.LENGTH_LONG).show();
if (savedInstanceState != null) {
// Restore last state for checked position.
mCurCheckPosition = savedInstanceState.getInt("curChoice", 0);
}
if (mDualPane) {
// In dual-pane mode, the list view highlights the selected
// item.
getListView().setChoiceMode(ListView.CHOICE_MODE_SINGLE);
// Make sure our UI is in the correct state.
showDetails(mCurCheckPosition);
} else {
// We also highlight in uni-pane just for fun
getListView().setChoiceMode(ListView.CHOICE_MODE_SINGLE);
getListView().setItemChecked(mCurCheckPosition, true);
}
} @Override
public void onSaveInstanceState(Bundle outState) {
super.onSaveInstanceState(outState);
Toast.makeText(getActivity(), "onSaveInstanceState",
Toast.LENGTH_LONG).show();
outState.putInt("curChoice", mCurCheckPosition);
} void showDetails(int index) {
mCurCheckPosition = index;
// The basic design is mutli-pane (landscape on the phone) allows us
// to display both fragments (titles and details) with in the same
// activity; that is FragmentLayout -- one activity with two
// fragments.
// Else, it's single-pane (portrait on the phone) and we fire
// another activity to render the details fragment - two activities
// each with its own fragment .
//
if (mDualPane) {
// We can display everything in-place with fragments, so update
// the list to highlight the selected item and show the data.
// We keep highlighted the current selection
getListView().setItemChecked(index, true);
// Check what fragment is currently shown, replace if needed.
DetailsFragment details = (DetailsFragment) getFragmentManager()
.findFragmentById(R.id.details);
if (details == null || details.getShownIndex() != index) {
// Make new fragment to show this selection.
details = DetailsFragment.newInstance(index);
Toast.makeText(getActivity(),
"showDetails dual-pane: create and replace fragment",
Toast.LENGTH_LONG).show();
// Execute a transaction, replacing any existing fragment
// with this one inside the frame.
FragmentTransaction ft = getFragmentManager()
.beginTransaction();
ft.replace(R.id.details, details);
ft.setTransition(FragmentTransaction.TRANSIT_FRAGMENT_FADE);
ft.commit();
}
} else {
// Otherwise we need to launch a new activity to display
// the dialog fragment with selected text.
// That is: if this is a single-pane (e.g., portrait mode on a
// phone) then fire DetailsActivity to display the details
// fragment
// Create an intent for starting the DetailsActivity
Intent intent = new Intent();
// explicitly set the activity context and class
// associated with the intent (context, class)
intent.setClass(getActivity(), DetailsActivity.class);
// pass the current position
intent.putExtra("index", index);
startActivity(intent);
}
} // This is a secondary activity, to show what the user has selected when the
// screen is not large enough to show it all in one activity.
public static class DetailsActivity extends Activity {
@Override
protected void onCreate(Bundle savedInstanceState) {
super.onCreate(savedInstanceState);
Toast.makeText(this, "DetailsActivity", Toast.LENGTH_SHORT).show();
if (getResources().getConfiguration().orientation == Configuration.ORIENTATION_LANDSCAPE) {
// If the screen is now in landscape mode, we can show the
// dialog in-line with the list so we don't need this activity.
finish();
return;
}
if (savedInstanceState == null) {
// During initial setup, plug in the details fragment.
// create fragment
DetailsFragment details = new DetailsFragment();
// get and set the position input by user (i.e., "index")
// which is the construction arguments for this fragment
details.setArguments(getIntent().getExtras());
//
getFragmentManager().beginTransaction()
.add(android.R.id.content, details).commit();
}
}
}beginTransaction()
            DetailsFragment details = new DetailsFragment();
            details.setArguments(getIntent().getExtras());

            FragmentManager fragmentManager = getFragmentManager()
            FragmentTransaction fragmentTransaction = fragmentManager.beginTransaction();
            fragmentTransaction.add(R.id.contents, details);
fragmentTransaction.commit();details to add. Once the changes are made to the FragmentTransaction, commit() is called for the changes to take effect.
            // This is the secondary fragment, displaying the details of a particular
            // item.

            public static class DetailsFragment extends Fragment {

                        **snippet**

                        public int getShownIndex() {
                                    return getArguments().getInt("index", 0);
                        }

                        // The system calls this when it's time for the fragment to draw its
                        // user interface for the first time. To draw a UI for your fragment,
                        // you must return a View from this method that is the root of your
                        // fragment's layout. You can return null if the fragment does not
                        // provide a UI.

                        // We create the UI with a scrollview and text and return a reference to
                        // the scoller which is then drawn to the screen

                        @Override
                        public View onCreateView(LayoutInflater inflater, ViewGroup container,
                                                Bundle savedInstanceState) {

                            **snippet**

                                // programmatically create a scrollview and textview for the text in
                                // the container/fragment layout. Set up the properties and add the view

                                ScrollView scroller = new ScrollView(getActivity());
                                TextView text = new TextView(getActivity());
                                int padding = (int) TypedValue.applyDimension(
                                                    TypedValue.COMPLEX_UNIT_DIP, 4, getActivity()
                                                                  .getResources().getDisplayMetrics());
                                text.setPadding(padding, padding, padding, padding);
                                scroller.addView(text);
                                text.setText(Shakespeare.DIALOGUE[getShownIndex()]);
                                return scroller;
                        }
            }