The phone really is a Swiss army knife. It is a phone, camera, mp3 player -- and a million other things when you consider all the apps that you can download -- the flashlight app can come in very useful. The camera is used for lots of things: snaps, video, virtual reality, car safety apps. MyRuns1 uses the camera in a simple manner -- just to take a photo for the user profile. In this lecture, we discuss how to use the camera.
The demo code used in this lecture include:
Photo app with CameraDemoKotlin.zip.
This project allows the user to update
an existing picture in the UI -- we need to do this in MyRuns1 so the
code serves as a template to doing that. We will use FileProvidor
to access local files.
Many applications want to take a photo. We will discuss how an app can launch the camera, the user can take a photo and the control returns back to the app that invoked the camera. You will do this for the MyRuns Lab 1.
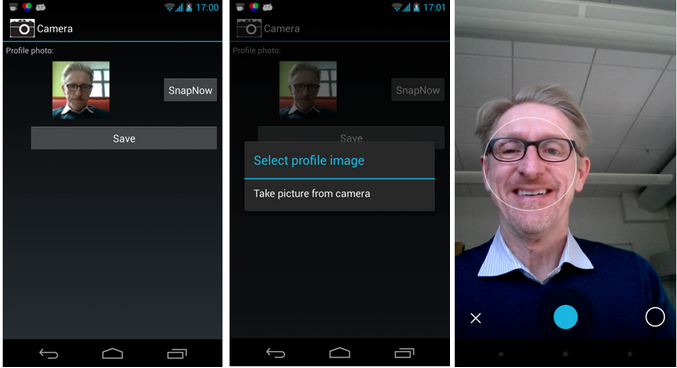
The app works as follows. The first free images are: 1) after the app is first launched; 2) when SnapNow is selected; 3) when the camera app is launched.
The next set of screen dumps show the remainder of the operations in the app workflow: 4) after the photo is take; 5) after the image has been inserted by replacing the existing photo.

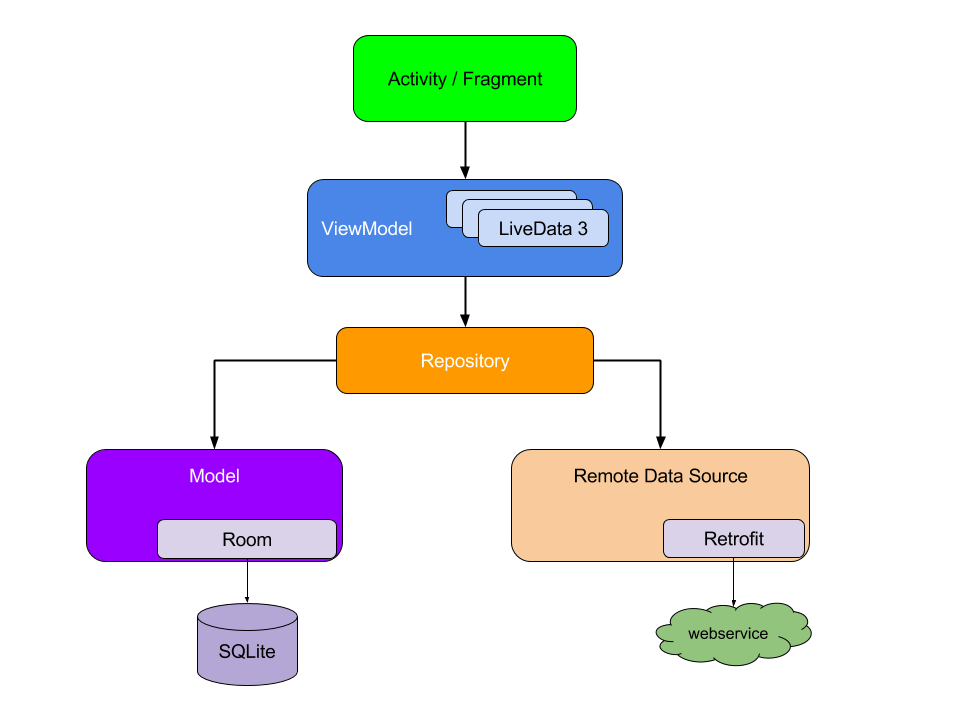
One nice thing about the MVVM architecture is that the UI layer does not need to handle the business logic to determine what data to be shown. This way user interfaces can be changed freely without impacting the business logic of the app. Similarly, the ViewModel layer can be updated freely without impacting the Model layer. We will see many examples of MVVM in this course. We will start with something simple by removing the Model layer. which you will see later in the course when we talk about database.
Our program has only View and ViewModel. LiveData is used in the
ViewModel to communicate information from ViewModel to View that should
update and redraw the screen.
A user can use our app to take a picture using the phone's builtin
camera app and then replace the existing picture if it
exists. The code also shows a way for other activities (e.g., camera
app) to return to the calling activity. For example registerForActivityResult()
is the return callback for the camera app after taking a photo.
First, note that in the manifest we have to be granted permission to use the camera app.
<uses-feature android:name="android.hardware.camera" />
<uses-permission android:name="android.permission.CAMERA" />
<uses-permission android:name="android.permission.WRITE_EXTERNAL_STORAGE" />
Next, we need to ask the user for the permission to use the camera
and write/read the external storage.
fun checkPermissions(activity: Activity?) {
    if (Build.VERSION.SDK_INT < 23) return
    if (ContextCompat.checkSelfPermission(activity!!, Manifest.permission.WRITE_EXTERNAL_STORAGE) != PackageManager.PERMISSION_GRANTED
        || ContextCompat.checkSelfPermission(activity, Manifest.permission.CAMERA) != PackageManager.PERMISSION_GRANTED) {
        ActivityCompat.requestPermissions(activity, arrayOf(Manifest.permission.WRITE_EXTERNAL_STORAGE, Manifest.permission.CAMERA), 0)
    }
}The onCreate() code sets of the view, asks for user permission, gets a reference to the image saved on the phone via uniform resource identifier (URI). Uri is a string of characters used to identify a name or a web resource
override fun onCreate(savedInstanceState: Bundle?) {
    super.onCreate(savedInstanceState)
    setContentView(R.layout.activity_main)
    imageView = findViewById(R.id.imageProfile)
    textView = findViewById(R.id.text_view)

    Util.checkPermissions(this)

    val tempImgFile = File(getExternalFilesDir(null), tempImgFileName)
    tempImgUri = FileProvider.getUriForFile(this, "com.xd.camerademokotlin", tempImgFile)
    val bitmap = Util.getBitmap(this, tempImgUri)
    imageView.setImageBitmap(bitmap)

}
You probably are getting use to this now but if you want to start
another activity you need to fire an intent -- and that is exactly what
we do below. We create an intent using MediaStore.ACTION_IMAGE_CAPTURE
action.
We have now used two different types of intents called Implicit and explicit intents. We have used explicit intents numerous times to start activities such as shown below where we set the intent up to explicitly start a particular activity by naming the target activity
val intent = Intent(this@ActivityA, ActivityC::class.java)
The second type of intents are implicit intents, which we will use in this lecture. Implicit intents do not name a target but the action, as shown below. Implicit intents are often used to activate components in other applications. For example:
val intent = Intent(MediaStore.ACTION_IMAGE_CAPTURE)
intent.putExtra(MediaStore.EXTRA_OUTPUT, tempImgUri)
cameraResult.launch(intent)
The intent specifies the ACTION_IMAGE_CAPTURE action. The system resolves to start the activity capable of handling that action without explicitly starting a camera app. The Android system tries to find an app that is capable of performing the requested action in the implicit intent. It does this by considering the requested action, the data that has been passed in the intent (e.g., output picture location).
One issue with implicit intents is that you have no control over the
app; for example in the case of the camera or the gallery; you fire it
and hope for the best. This is a limitation of the approach.
The steps needed to take a photo and store it in a file are as follows:
e.g., an ActivityResult object) --
hopefully, the
photo was successfully taken.val cameraResult: ActivityResultLauncher<Intent> = registerForActivityResult(StartActivityForResult()){ result: ActivityResult ->
if(result.resultCode == Activity.RESULT_OK){
val bitmap = Util.getBitmap(this, tempImgUri)
myViewModel.userImage.value = bitmap
}
}In the code above, we check if there is a result by asking if "result.resultCode == Activity.RESULT_OK".
If the answer is yes, we pass the captured picture in Bitmap to the
ViewModel layer *not to the UI*. The idea is letting the View layer to
"observe" (or sense) if there is a new picture in the ViewModel. If the
answer is yes, it updates the app screen to show the picture.
class MyViewModel: ViewModel() {
    val userImage = MutableLiveData<Bitmap>()
}
Whenever we update the bitmap object held by the LiveData within the
ViewModel (e.g.,
myViewModel.userImage.value = bitmap), the View layer needs to
know in order for the UI to be updated. This is done using an Observer.
In the following code, "it" as a parameter has a reference to the
Bitmap. So whenever there is a change, the Lambda code will be
executed. Here we simply update the imageView to show the picture.
myViewModel.userImage.observe(this, Observer { it ->
    imageView.setImageBitmap(it)
})
Lastly, to create a ViewModel object in the MainActivity, we use a
ViewModelProvider, which takes
a LifecycleOwner object as a parameter. This means the observer will be
alive all the time the fragment/activity is alive.
myViewModel = ViewModelProvider(this).get(MyViewModel::class.java)
onSaveInstanceState() callback will be triggered for you to save light state data of your system using Bundle.
override fun onSaveInstanceState(outState: Bundle) {
    super.onSaveInstanceState(outState)
    outState.putString(TEXTVIEW_KEY, line)
}
As an example, we recover the picture Uri from the Bundle that is passed by the system to the newly created activity.
override fun onCreate(savedInstanceState: Bundle?) {

    ...
    if(savedInstanceState != null)
        line = savedInstanceState.getString(TEXTVIEW_KEY);
}
Android has a number of options to store the apps data. Take a look at the developer notes for more details. MyRuns1 will require you to save data to a file.
The options for storage in Android can be summarized as:
We will use all of these options when building out the complete MyRuns app.
Also read write to a file in Kotlin.