We carry on discussing App Engine and support for building cloud services.
The key resource and the most up to date information can be viewed here: Google Cloud Messaging for Android.
The first part of this lecture is how to incorporate GCM to your existing android application. We will guide you through the step-by-step process on how to do that. The set up steps presented below are taken from this GCM tutorial.
We further discuss about a demo app on how to send data from the phone and receive GCM messages from the server. You can find the demo zoo here- GCM Demo
At the end we discuss how to deploy your backend on the cloud, so that you can access your server public from your phone.
Google Cloud Messaging (GCM) is a service that allows you to send push notifications from your server to your users' Android devices, and also to receive messages from devices on the same connection. The GCM service handles all aspects of queueing of messages and delivery to the target Android application running on the target device.
This backend template employs Google Cloud Endpoints to define a RESTful API which registers Android devices with your GCM server and allows you to send string messages to registered devices. After defining this API, strongly-typed client libraries are generated automatically and can be called from your Android app, as described below.
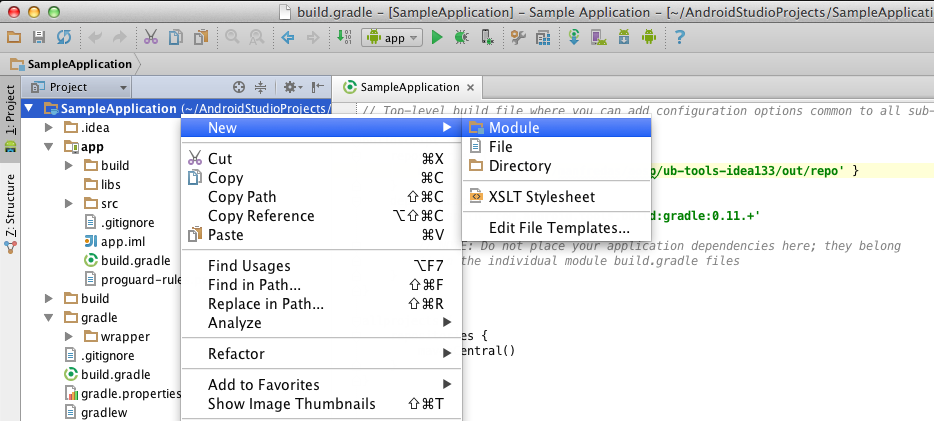
To add the backend to your existing Android app from this backend template, open Android Studio (installation instructions) and navigate to "File → New Module..." or right-click on your project and choose "New → Module".
In the "New Module" wizard that appears, choose "Google Cloud Module":
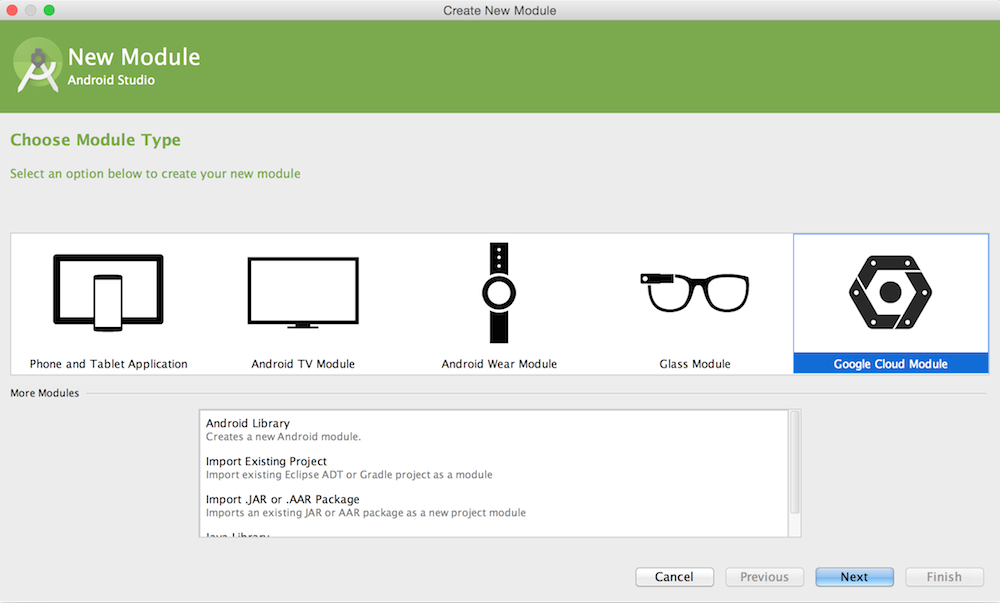
Then choose "App Engine Backend with Google Cloud Messaging".
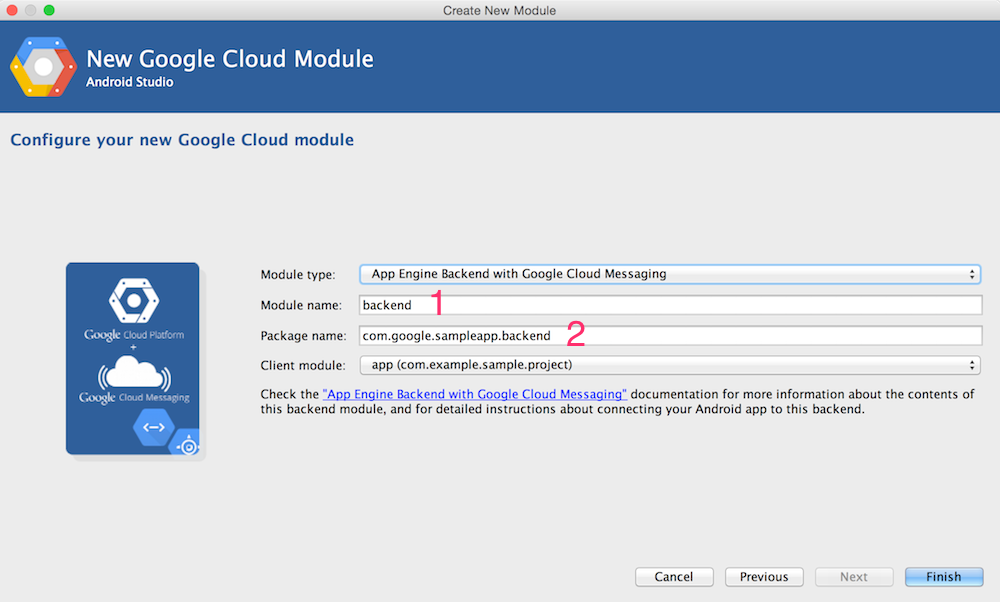
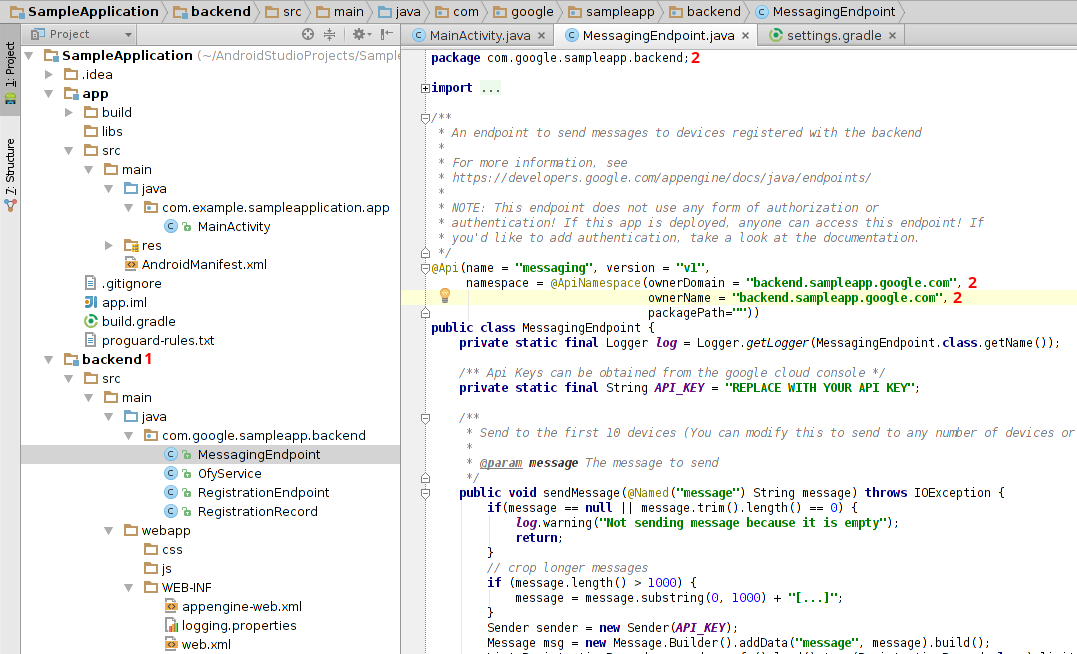
Enter the module/package names for your new backend, and choose the "client" module in your project which contains your Android app. The client module will be set up to call your newly generated backend. Module name which you've entered above (marked with red 1) will be used in your Android Studio project. Package name (marked with red 2) will be used for all classes imported from this template and (reversed) for Endpoints API namespaces. In turn, Endpoints API namespaces will be used to derive the name of the autogenerated Android client libraries, hence this ensures that the names of generated client libraries will match your package name.
As soon as the backend module is added to your project and Gradle sync finishes, a new run configuration with your backend's module name should be created:
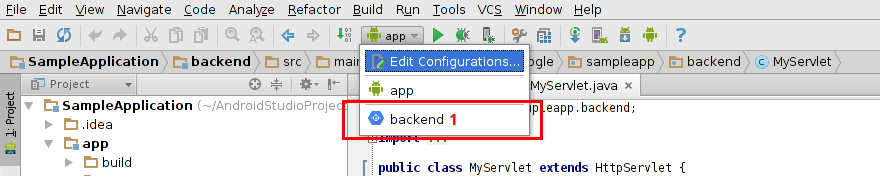
Rebuild your project (via "Build → Rebuild Project") and launch this run configuration. It will invoke appengineRun task in Gradle plug-in for App Engine, which in turn will start the local App Engine Java development server.
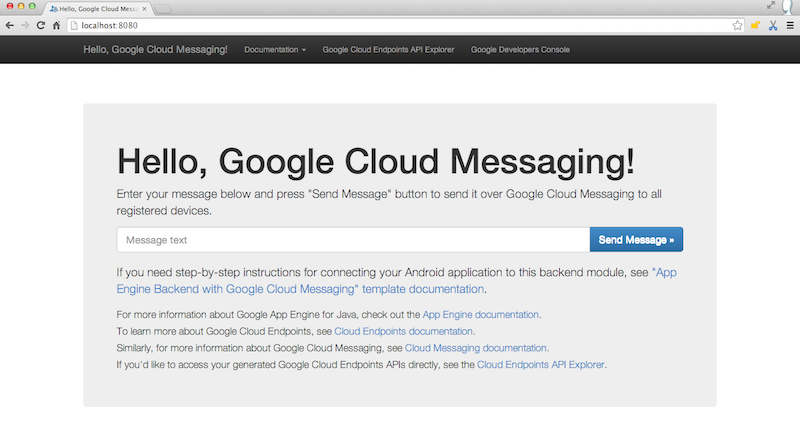
To ensure that your backend started successfully, navigate to http://localhost:8080. If everything went well, you should see the following page:
Before testing the application, you will need to obtain a
Google Cloud Messaging API key. Open the
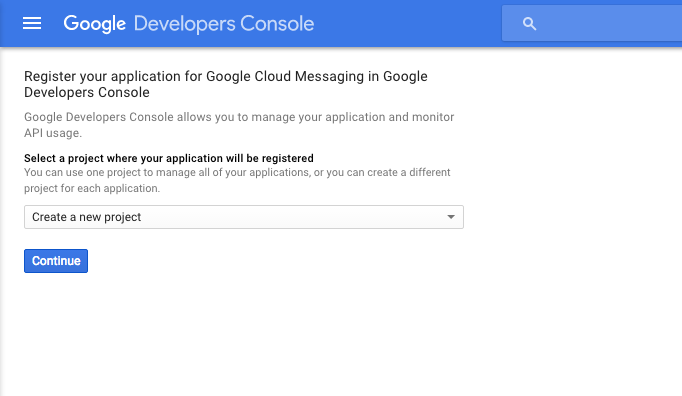
Choose a "Create a new project" option to create a new Google Developers Console project (or choose an existing project, if you have one already), and click "Continue".
Read the Terms of Service and assuming that you agree, check the checkbox to indicate that you have read them and click "Accept".
Once you select or create a project, it will have "Google Cloud Messaging for Android" API enabled automatically. In the following configuration dialog, you can use the supplied "0.0.0.0/0" IP address for testing purposes.
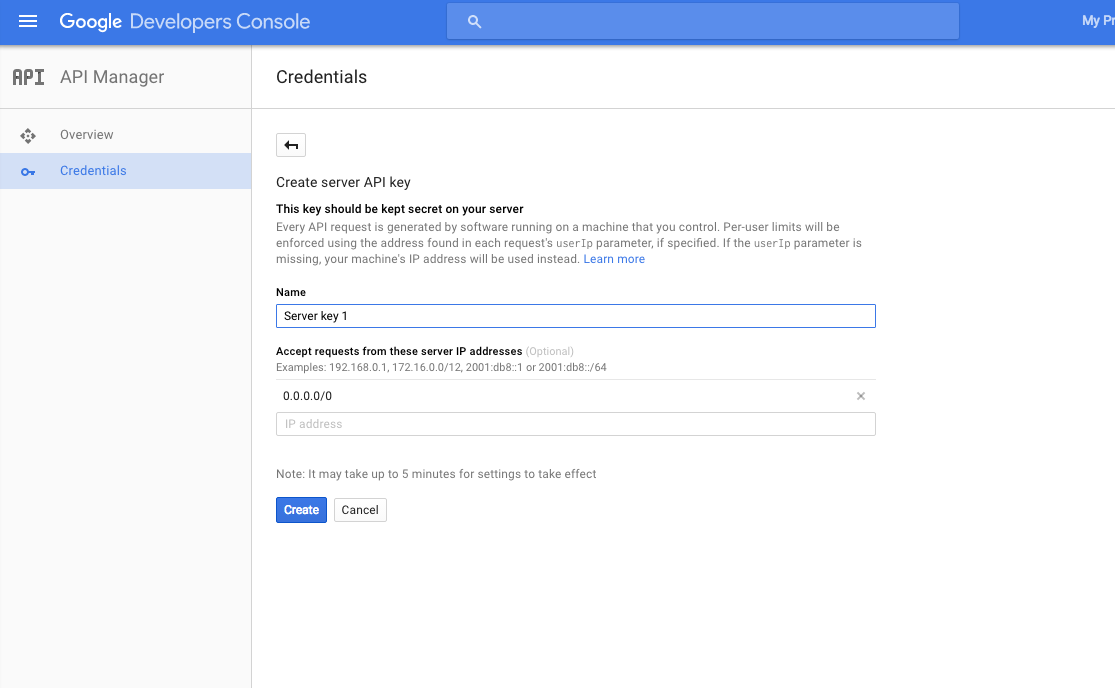
Click "Create" to get the API key for server applications generated for you.
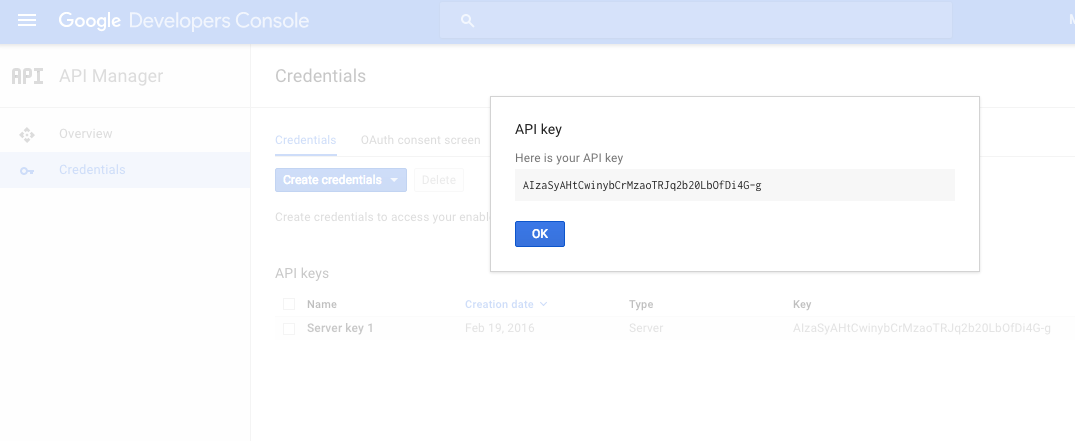
Copy the generated API key (in a red rectangle, starts with AIza...) back into appengine-web.xml file, replacing
<property name="gcm.api.key" value="YOUR_KEY_HERE"/>with
<property name="gcm.api.key" value="AIza..."/>Finally, go to GoogleAPIs menu -> "IAM & Admin" -> "Settings" and note down the project ID and project number:
Your project number will be your Google Cloud Messaging sender ID in the next step and your project ID (e.g. abstract-arc-123122) will be a part of the URL you need to access your backend in the cloud (e.g. https://abstract-arc-123122.appspot.com).
Before any messages can be sent from a Google Cloud Messaging backend to the devices, these devices need to be registered with a GCM backend.
When you added this backend module to your project, the required permissions, needed by Google Cloud Messaging have been added into the Android manifest of your app, and the required build dependencies have been added to your app's build.gradle file.
Furthermore, a RegistrationEndpoint Cloud Endpoints API has been automatically generated for you, so that you could start calling this endpoint from your Android app to register devices with your new Google Cloud Messaging backend.
Here is an example code snippet which illustrates how to create an AsyncTask to register the user's device with your new backend:
class GcmRegistrationAsyncTask extends AsyncTask<Void, Void, String> {
 private static Registration regService = null;
 private GoogleCloudMessaging gcm;
 private Context context;

 // TODO: change to your own sender ID to Google Developers Console project number, as per instructions above
 private static final String SENDER_ID = "1234567890123";

 public GcmRegistrationAsyncTask(Context context) {
 	this.context = context;
 }

 @Override
 protected String doInBackground(Void... params) {
 	if (regService == null) {
 		Registration.Builder builder = new Registration.Builder(AndroidHttp.newCompatibleTransport(),
 		new AndroidJsonFactory(), null)
 		// Need setRootUrl and setGoogleClientRequestInitializer only for local testing,
		// otherwise they can be skipped
		.setRootUrl("http://10.0.2.2:8080/_ah/api/")
 		.setGoogleClientRequestInitializer(new GoogleClientRequestInitializer() {
 			@Override
			public void initialize(AbstractGoogleClientRequest<?> abstractGoogleClientRequest) throws IOException {
				abstractGoogleClientRequest.setDisableGZipContent(true);
 			}
 		});
 // end of optional local run code
		regService = builder.build();
 	}

 	String msg = "";
 	try {
 		if (gcm == null) {
 			gcm = GoogleCloudMessaging.getInstance(context);
 		}
 		String regId = gcm.register(SENDER_ID);
 		msg = "Device registered, registration ID=" + regId;

 		// You should send the registration ID to your server over HTTP,
		// so it can use GCM/HTTP or CCS to send messages to your app.
		// The request to your server should be authenticated if your app
		// is using accounts.
		regService.register(regId).execute();

 		} catch (IOException ex) {
 			ex.printStackTrace();
 			msg = "Error: " + ex.getMessage();
 		}
 		return msg;
 }

 @Override
 protected void onPostExecute(String msg) {
 	Toast.makeText(context, msg, Toast.LENGTH_LONG).show();
 	Logger.getLogger("REGISTRATION").log(Level.INFO, msg);
 }
}
Don't forget to replace SENDER_ID in the snippet above with your actual Google Developers Console project number!
To make the actual registration call from your app, invoke this AsyncTask from one of your Android activities. For example, to execute it from MainActivity class, add the following code snippet to MainActivity.onCreate method:
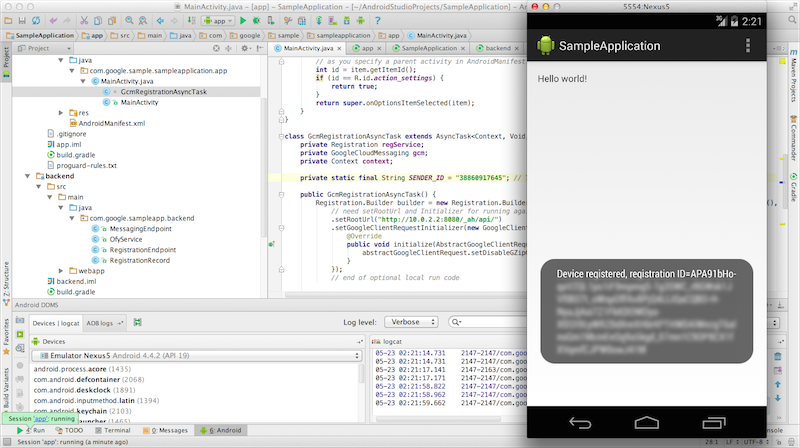
new GcmRegistrationAsyncTask(this).execute();If you have added an GcmRegistrationAsyncTask invokation to one of your Android app activities as per steps above (and replaced SENDER_ID with your actual Google Developers Console project number), you should be all set to test the device registration with your backend locally!
To begin with, make sure that your Android Virtual Device is using Google APIs System Image as illustrated in the screenshot below.
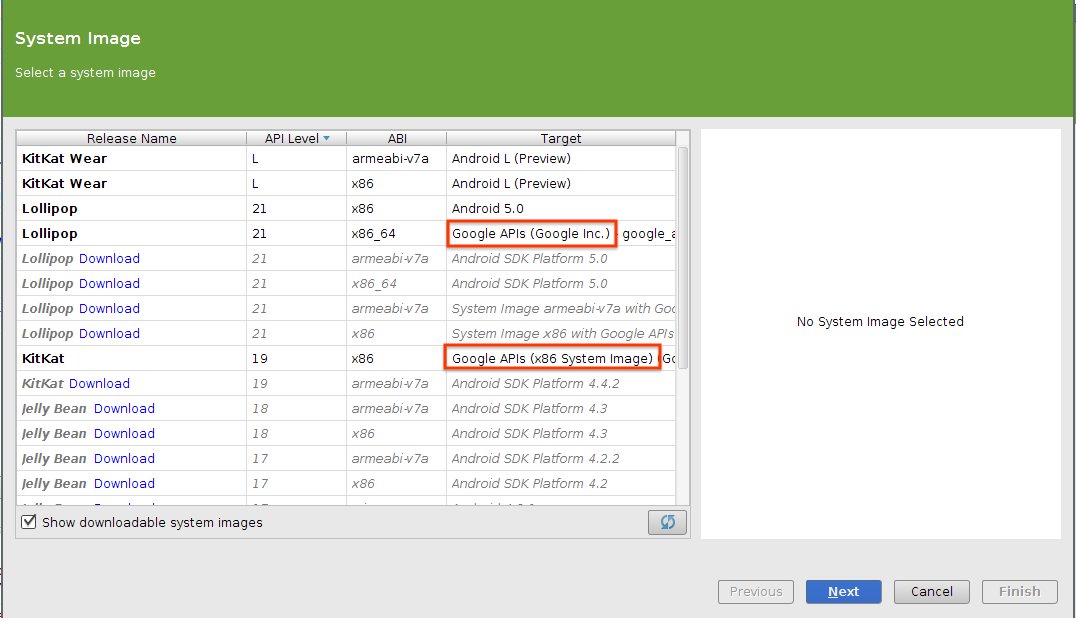
Then, launch your backend locally as described earlier. and ensure that you can access it via http://localhost:8080. If you can access the backend locally, change the run configuration back to your Android app and run the Android emulator.
If everything goes well, you should see the following toast in your app:
In order to show the push notifications coming from the generated backend, you need to add two more simple classes into your Android client: GcmIntentService and GcmBroadcastReceiver.
Here is the source code for GcmIntentService.java:
public class GcmIntentService extends IntentService {

 public GcmIntentService() {
 	super("GcmIntentService");
 }

 @Override
 protected void onHandleIntent(Intent intent) {
 	Bundle extras = intent.getExtras();
 	GoogleCloudMessaging gcm = GoogleCloudMessaging.getInstance(this);
 	// The getMessageType() intent parameter must be the intent you received
	// in your BroadcastReceiver.
	String messageType = gcm.getMessageType(intent);

 	if (extras != null && !extras.isEmpty()) { // has effect of unparcelling Bundle
		// Since we're not using two way messaging, this is all we really to check for
		if (GoogleCloudMessaging.MESSAGE_TYPE_MESSAGE.equals(messageType)) {
 			Logger.getLogger("GCM_RECEIVED").log(Level.INFO, extras.toString());

 			showToast(extras.getString("message"));
 		}
	}
 	GcmBroadcastReceiver.completeWakefulIntent(intent);
 }

 protected void showToast(final String message) {
 	new Handler(Looper.getMainLooper()).post(new Runnable() {
 		@Override
 		public void run() {
 			Toast.makeText(getApplicationContext(), message, Toast.LENGTH_LONG).show();
 		}
 	});
 }
}
Similarly, here is the source code for GcmBroadcastReceiver.java:
public class GcmBroadcastReceiver extends WakefulBroadcastReceiver {
 @Override
 public void onReceive(Context context, Intent intent) {
 	// Explicitly specify that GcmIntentService will handle the intent.
	ComponentName comp = new ComponentName(context.getPackageName(),
 	GcmIntentService.class.getName());
 	// Start the service, keeping the device awake while it is launching.
	startWakefulService(context, (intent.setComponent(comp)));
 	setResultCode(Activity.RESULT_OK);
 }
}
After adding these classes to your Android application,
register
them by adding the following snipped into your AndroidManifest.xml file
(inside
<receiver
 	android:name=".GcmBroadcastReceiver"
	android:permission="com.google.android.c2dm.permission.SEND" >
 	<intent-filter>
		<action android:name="com.google.android.c2dm.intent.RECEIVE" />
 		<category android:name="MY_PACKAGE" />
 	</intent-filter>
</receiver>
<service android:name=".GcmIntentService" />
Do not forget to replace MY_PACKAGE in the snippet above with your package name.
This demo includes various components which are required for your app to interact with the cloud. The app includes GCM, and also the ability of the android app to post data to the server. Simply download and open the demo from here- GCM Demo. This demo is actually a combination of the GCM (the same tutorial we just saw) and the GAE Sample code demo that was discussed in the last lecture.
The code demoed in the class can be found here.
Once you load the demo, the project structure should look like this-
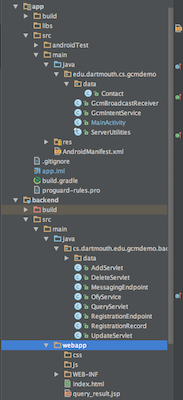
So the basic functionality of the app is when you click on the ‘POST DATA’ button, it posts some Contact data to the server, which gets stored in the Datastore. On successful addition of the data to the data store, the Server sends a GCM message saying -“Added” which is then displayed in the app. Also if you add a contact data from the browser (Like we did in the GAE Sample code in the last lecture) a GCM message is sent to the phone saying -“Added”.
To get started, you should have a look at how we are sending data the server from the app. You should take a look at the MainActivity.java and ServerUtilities.java, because these are files responsible for sending data.
Apart from that, everything else is the same as the two demos we saw before- the tutorial for GCM and the GAE sample demo in the last lecture.
If your backend is working locally, you can deploy it to Google App Engine.
Stop the backend, if it is running locally, by selecting Run > Stop.
Run Build > Deploy Module to App Engine. In the Deploy to App Engine dialog, select your module. In Deploy To: select an existing project, which has your server API key and then click Deploy. Or you can create a new project by taking the following steps.
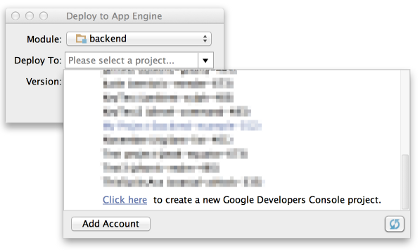
From the Deploy To: dropdown list, choose "Click here to create a new Google Developers Console project." This will open Google Developers Console.
*If you are running this task for the first time, you will be prompted to sign-in with your Google Account. Choose an account and sign in.
Create a new project and switch back to the Deploy to App Engine dialog in Android Studio.
This would probably be a good time to update your
src/main/webapp/WEB-INF/appengine-web.xml file's
Click the Refresh button Deploy module to App Engine in the bottom right corner of the Deploy To: dropdown list and then select the project you just created.
Click Deploy. You can monitor the status of your deployment in the Android Studio console.
Once you have deployed your backend to App Engine, you can connect your Android app to it by modifying GcmRegistrationAsyncTask class defined above. In particular, replace the lines
Registration.Builder builder = new Registration.Builder(AndroidHttp.newCompatibleTransport(), new AndroidJsonFactory(), null)
 	.setRootUrl("http://10.0.2.2:8080/_ah/api/") // 10.0.2.2 is localhost's IP address in Android emulator
	.setGoogleClientRequestInitializer(new GoogleClientRequestInitializer() {
 	@Override
	public void initialize(AbstractGoogleClientRequest<?> abstractGoogleClientRequest) throws IOException {
 		abstractGoogleClientRequest.setDisableGZipContent(true);
 	}
 });
with these two lines
Registration.Builder builder = new Registration.Builder(AndroidHttp.newCompatibleTransport(), new AndroidJsonFactory(), null)
 .setRootUrl("https://android-app-backend.appspot.com/_ah/api/");
where android-app-backend corresponds to your own Project ID (e.g. abstract-arc-123122)
At this point you should be all set to run your Android app in an emulator or on the physical device, and successfully communicate with your new App Engine backend!