List Implementation 1: Singly Linked List
Today we'll implement the List ADT we discussed last lecture using a linked list. Next class we'll implement the same functionality using an array. We will then compare and constrast the two implementations to see the pros and cons of each. We will also discuss when you mighy perfer one implementation over another.
All the code files for today: SinglyLinked.java; ListTest.java; ListExceptions.java; SimpleIterator.java; TimeTest.java.
Singly linked list implementation
Today we implment the List ADT using a linked list. Last lecture we discussed that an ADT is defined in an implments. For example:
public class SinglyLinked implements SimpleList
By adding implements we are telling Java that we promise to implement each method specified in the interface. If we don't Java complains.
You most likely saw linked lists in an earlier programming class, so I will just go over the simplest version here, SinglyLinked.java in order to demonstrate the idea and see how we can use a linked list to implement the SimpleList.java List ADT interface. The book elaborates and has more powerful implementations (including doubly linked).
A linked list is made up of Elements, each of which holds one data item for the List, and points to the next item in the List. However, the next of the last element is Element class is defined inside the SinglyLinked class — it's an Element<T>; here, the type variable comes along from the containing class.
The List itself then just points to the first element, called the
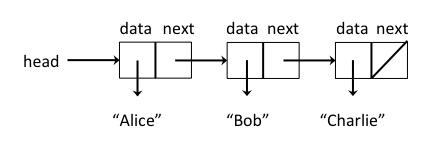
(We indicate a null reference with a slash.)
To get item #idx, we advance down the list that many times, following the next pointers from the head to its next to its next, .... We then extract the data from that element. To set, we do the same thing but replace the item once we obtain the element. One tricky thing is the counting. We count from 0 as the head. So to get element #1, we need to advance once, which is exactly what the loop does — executes when n==1>0, then decrements n and terminates. In both cases, if we try to go past the end of the list (hit a null for next) we throw a friendly exception.
To add an element at an index, we need to advance one fewer step than that index, and splice in the new element as the next of that element. E.g. to add at index 1, we splice in a new element as the next of element 0 (and make the new element's next be the previous next of # 0). This gives us a special case of adding at index 0: make the new element the head and its next the old head.
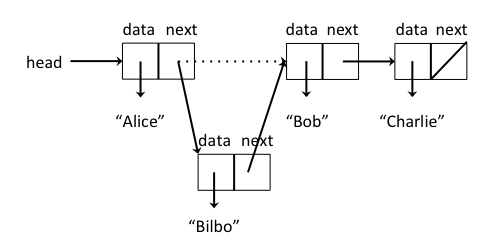
To remove we do much the same thing, but splice out the removed element by setting the next of element idx-1 to the removed element's next.
Finally, we can make a printable string representation by iterating down the list, starting from the head and adding a string representation of each element's data along with a separator between the elements.
Exceptions
You might have noticed in the SimpleList interface that a number of the methods indicate "throws Exception". We've pretty much ignored explicit exception handling so far (though no doubt you've gotten an exception at run time!), but this seems like a good time to discuss it. An exception indicates something happened at run-time that wasn't part of the "standard" flow, in that there's not a clear way to continue from this point. For example, if we ask for element an index of -1 from a list, what should be returned? There is no item at index -1. The first item is at index 0. So, what should happen? There's no good answer, so we throw an exception. Essentially we tell the caller, something went wrong, I'm letting you know, now you decide what to do about it. Here is an example from SinglyLinked.java that first checks to see if add was passed a valid index. If the index was invalid, the code
public void add(int idx, T item) throws Exception {
    //safety check for valid index (can add at size index)
    if (idx < 0 || idx > size) {
      throw new Exception("invalid index");
    }
When an exception is thrown the program stops what it was doing and goes into error-handling mode. Exceptions are either caught and handled in the method that throws them or passed on to the method that called it. If that method does not catch the exception it is passed to the method that calls it, etc. If the main program does not catch the exception it kills the program and prints an error message. You probably have seen these messages for null pointers or subscript out of bounds.
Exceptions are an excellent way of passing an error on to a method that knows a reasonable way to handle them. Exceptions usually occur in a low-level method. Consider trying to open a file that does not exist. The file-opening method has no idea what the programmer wants to do if the file can't be opened. Maybe the method that calls it has no idea, either. If you don't know a good way to handle the exception it is best to pass it on. Eventually you will get to a high-level method that does know what to do about the situation. If the file name was just entered by the user it might be good to give her a second chance. Or it may be that the programmer has a backup file to use if the first cannot be opened. Or it could be that the right thing to do is to print an error message and quit the program. Exceptions give a way to let the low-level method that discovers the problem pass it on to a method that knows what to do about it.
In the example above, we simply passed the buck. And really, there's not much more we could intelligently do for such a simple example. But the simple example provides an opportunity to illustrate the mechanism for catching exceptions, so that then we can use that later (soon) when there is a reasonable alternative. The basic idea is to wrap a
If you look at ListTest.java, you'll see that the main declares that it throws Exception, since it calls List methods that may. We know they won't, by reasoning about the code, but Java doesn't. If we want to "hide" that possibility, we have to wrap those calls in try-catch. See ListExceptions.java. For example, if we try to call add and pass an index of -1, we know from the code above that add will throw an exception. We can catch that exception and keep executing by using a try-catch block. Below the try block attempts to run. If there is an exception in the try block, execution jumps to the catch block. If there is no exception in the try block, the catch block does not execute. In this case, because we pass an invalid index when calling the add method, the code for add throws an exception, so the code below jumps to the catch block and prints "caught it". Execution then continues.
SimpleList list = new SinglyLinked();

try {
  list.add(-1, "?");
  System.out.println("I never run!");
  System.out.println("Neither do I");
}
catch (Exception e) {
  System.out.println("caught it!"); // will print -- we know this is bogus
}
Note that throws Exception means a method may have an unexpected exit that should be handled, not that it necessarily will. But since it's a possibility, we have to be prepared for it.
To summarize, there are two possibilities when writing a method (here main) that invokes a method declaring that it throws Exception:
- Declare that our method
throws Exception, and may pass the buck - Wrap the potentially exception-throwing code in try-catch, and handle it
And actually, we could have a hybrid approach, where we try-catch, and if we don't like what we caught, we throw it on up the line.
When should we go one way or another, and at what granularity? It really depends on whether we would know how to deal with the exceptional case(s). If so, wrap the try-catch just around the bit that can be handled, with an appropriate catch block for the case(s). If not, pass the buck.
Iteration
Our list interface is sufficient to do lots of things with lists. For example, we can see if an element appears in the list by getting each item and seeing if it's what we wanted, and we can test equality of two lists by marching down each of them in tandem and comparing items.
This style of going through a data structure is so common that there's a name for it: an
for (Student s : students) {

}
Contrast this with what we'd have to write with a traditional indexed for-loop:
for (int i=0; i<students.size(); i++) {
  students.get(i).study(1);
}
There are several advantages to the for-each loop. It's just easier to read, once you're used to it (which hopefully you are by now, if you weren't before!). The indexed for-loop has a variable i that serves no purpose other than to step through the items — we don't actually care what its value is, so it's in some sense extraneous. And one should never waste bits! Perhaps most importantly in this example, the indexed for-loop is much less efficient for a linked-list implementation. Recall that the way get works in a linked list is that it starts at the beginning, and steps down the list the specified number of times. So each time through the loop, we go back to the start of the list again, rather than just picking up where we left off. This actually leads to a quadratic algorithm! For each i, we have to advance i times from the start. And 1+2+3+...+n is n*(n+1)/2, which is O(n^2).
An iterator keeps track of where it is in the iteration, so can be more efficient. At its heart, an iterator has two methods: hasNext tells us whether or not there's something left to get, and next gets it and advances the iteration. So our for-each loop is really:
for (Iterator iter = list.iterator(); iter.hasNext(); ) {
  T item = iter.next();

}
Note that the "advance" part of the for loop is empty, as the next call in the body of the loop both gets the next thing and advances so that a subsequent call will be for the subsequent element. That is:
Iterator<Student> i = students.iterator();
Student s0 = i.next(); // return the 0th element [if there is one; else exception]
Student s1 = i.next(); // returns the 1st element [if there is one; else exception]
Now, the iterator-based loop is no more (and perhaps) less readable than the int-counter loop. But it (might be) more efficient, as the iterator can "remember" where it is, and not have to go back to the beginning each time. And with a bit of "syntactic sugar", we can write a beautiful for-each loop and rely on our language to compile it down into an iterator, without us even having to think about that. The iterator version also makes clear exactly what the loop is all about.
Now details. Look at the interface for the iterator, SimpleIterator.java. Then a full example of the indexed and iterator loops in action: ListTest.java.
The implementation of an iterator for a linked list just keeps a pointer to an element, and advances by the next when asked to. When we reach the end (null), we indicate that there is no next. See SinglyLinked.java.
The Java list iterator, as well as that described in the book, is quite a bit fancier. It supports moving bidirectionally (in a doubly linked implementation), adding/removing/replacing at the current position, etc. But the basic idea of packaging up a position into a List remains the same.
Java notes
- interface
- An interface specifies a set of methods, but no instance variables, and does not provide implementations for those methods. When a class "implement"s an interface, it must provide all the method implementations.
- head
- The first item in a List. The last item is sometimes called the tail.
- inner class
- A class can be defined inside another class. This is useful, e.g., if it just supports the work of that class. The inner class then has access to the outer class variables and methods.
- null
- This indicates a non-existent object.
- throws
- This annotation on a function indicates that it can pass up an exception to its caller (which then must handle it or pass it on).
- try/catch/finally
- Exception-handling machinery is introduced in more detail in the body of the notes. This is the syntax for wrapping up some code that might throw an
Exception. - System.err
- Same idea as System.out except it's meant for error messages.