16. Images
Basics
We can use images in Processing much the same way that we use ellipses and so forth.
Images can also be loaded from the web directly. Use the loadImage() function, given the URL filename (in quotes), to load it into p5js. The loadImage() function returns an object of type PImage. Make sure to call this function in the setup function (or draw), but not in the outside code. Thus we typically declare the variables at the top, and load the images within setup(). Typically, we only need to laod images once, which means setup() is the appropriate place.
We can use a loaded image as the background, passing a PImage rather than a color to the background() function. In that case, the window size and image size have to match. See Processing example Basics | Image | BackgroundImage.
We can also draw an image at a selected position on the window, using the image() function. The first parameter is the PImage, and the second and third are the x and y coordinates of its upper-left corner (like a rect). If desired, we can pass two more parameters to set the width and height of the image; it will be scaled accordingly. See Processing example Basics | Image | LoadDisplayImage. Play around with these functions for some of your favorite images. Note that to get high quality image rescaling, you should use the smooth() function.
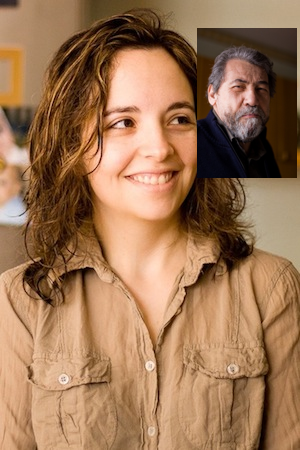
Here's an example putting these two things together.
let bcakground; // background image
let sprite;     // image to be moved around ('sprite')

function setup()
{
  createCanvas(300,450);
  smooth(); // improves quality when resizing images

  // load images
  bcakground = loadImage("img-1.jpg");
  sprite = loadImage("img-2.jpg");
}

function draw()
{
  // paint background
  imageMode(CORNER); // specify it at the corners, easier for backgrounds
  background(bcakground);

  // paint sprite
  imageMode(CENTER); // specify at the center, easier for sprites
  image(sprite,mouseX,mouseY,100,150); // note the rescaling
}
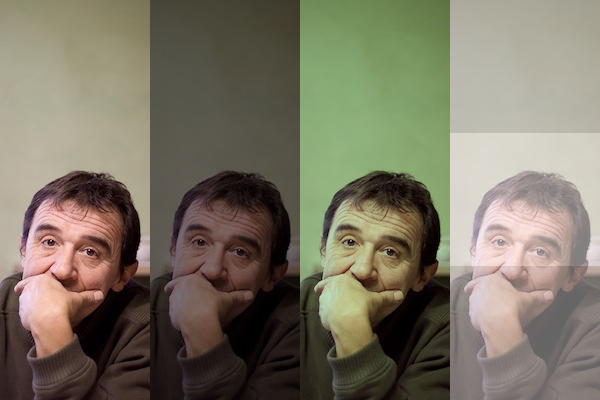
We can modify the colors with which images are drawn using the tint() function. The tint of an image is somewhat analogous to the fill color of an ellipse. Since the image already has colors, though, the tint just modifies them; in particular it multiplies the image colors by the tint values. The tint() function works the same way as fill() -- gray value or r/g/b values, with an optional transparency; noTint() goes back to normal. We can modify the transparency without the color by using a gray value of 255 (white).
createCanvas(600,400);
smooth();

let img = loadImage("people-3.jpg");

// Put a bar in the background to illustrate transparency
noStroke();
rect(0,height/3,width,height/3);

// Normal
image(img,0,0);
tint(128); // Grayer
image(img,150,0);
tint(200,255,200); // Greener
image(img,300,0);
tint(255,128); // Somewhat transparent
image(img,450,0);
Png images may have portions that are already transparent. Processing does the right thing. (Gif also support a bit of rasparency, but with very low quality.) The Processing example Basics | Image | Sprite illustrates. The gif provided with it only has a little transparency on the outside, so I modified it (below) so that everything that isn't black is transparent. The sketch folder also has a background image, but the sketch doesn't use it unless you edit it appropriately.

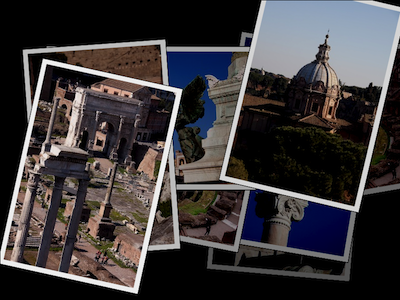
Finally (for the basics), inspired by the Reas & Fry Synthesis sketch "collage", here's a sketch to generate a postcard collage of randomly-positioned and oriented images. We generate the filename of each image by appending the string "rome-" with a number (i+1) and the string ".jpg", thus giving "rome-1.jpg", "rome-2.jpg", etc. on successive iterations. The images are stored in an array, and they are randomly selected once in while to be place down. The random translation and rotation use coordinate transformations. We make use of the width and height fields of the image to determine the image size and draw a postcard border around them.
// Based on Reas & Fry Synthesis 1

let imgs = new Array(15); // An array of images

function setup()
{
  createCanvas(800,600);
  smooth();
  background(0);
  imageMode(CENTER);
  frameRate(20); // slow it down

  // The images are named "rome-1.jpg", "rome-2.jpg", etc.
  for (var i=0; i<imgs.length; i++)
    imgs[i] = loadImage("rome-"+(i+1)+".jpg");
}

function draw()
{
  // fade away olf stuff
  fill(0,1); rectMode(CORNER); rect(0,0,width,height);

  // once in while add an image
  if(frameCount % 20 == 0) {
    // pick a random image from the array
    PImage img = imgs[var(random(imgs.length))];

    // random position and rotation
    //translate(random(img.width,width-img.width),
    //          random(img.height,height-img.height));
    //rotate(random(-PI/4,PI/4));
    translate(random(100,width-100),random(100,height-100));
    rotate(random(radians(-15),radians(15)));

    // paint the image and a border
    fill(255); rectMode(CENTER); rect(0,0,img.width+20,img.height+20);
    image(img,0,0,img.width,img.height);
  }
}
Animation
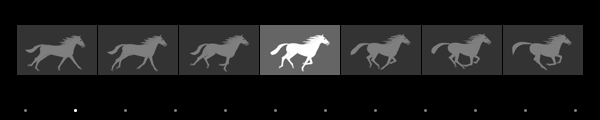
In addition to moving images around the window, we can change which image is drawn for each frame. Thus, mimiking traditional animation image-based animation. Here is an example of doing this with a rotoscoped animation from Wikipedia (released under public domain). The sketch will play the animation forever automatically advancing which image is display after a certain amount of time (measured by timer). You can also set which image is displayed, by pressing the mouse, obtaining the "scrubbing" behavior of iMovie/iTunes.
PImage[] frames = new PImage[12];

var currentFrame = 0;       // displayed frame
var timer = 5;              // number of frames before the next

function setup()
{
  createCanvas(320, 220);
  smooth();
  background(0);
  frameRate(60);

  for(var i = 0; i < frames.length; i ++) {
    frames[i] = loadImage("horse-"+(i+1)+".png");
  }
}

function draw()
{
  // draw the image
  image(frames[currentFrame],0,0);
  // scrubbing ala iMovie
  if(mouseIsPressed) {
    currentFrame = constrain((frames.length*mouseX)/width,0,frames.length-1);
    timer = 10;
  } else {
    // advance if the timer is done, or decrese the timer
    if(timer == 0)  {
      currentFrame = (currentFrame+1)%frames.length;
      timer = 5;
    }
    else timer--;
  }

  // draw the frame bar
  fill(0); noStroke(); rect(0,height-20,width,20);
  for(var i = 0; i < frames.length; i ++) {
    stroke(128); strokeWeight(3);
    point(width*(i+0.5)/(frames.length),height-10);
  }
  stroke(255);
  point(width*(currentFrame+0.5)/(frames.length),height-10);
}
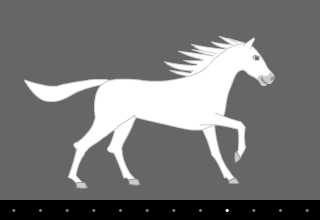
Here is a visualization of the same sequence where I show the frames that come before and after the current one. This really show how rotoscsoping work.
PImage[] frames = new PImage[12];

var currentFrame = 0;       // displayed frame
var timer = 5;              // number of frames before the next

function setup()
{
  createCanvas(600, 120);
  smooth();
  background(0);
  frameRate(60);

  for(var i = 0; i < frames.length; i ++) {
    frames[i] = loadImage("horse-"+(i+1)+".png");
  }
}

function draw()
{
  // draw the images
  imageMode(CENTER);
  for(var i = -3; i <= 3; i ++) {
    var f = (currentFrame+i+frames.length)%frames.length;
    if(i == 0) tint(255); else tint(128);
    image(frames[f],
      i*(frames[f].width/4+1)+width/2,(height-20)/2,
      frames[f].width/4,frames[f].height/4);
  }

  // scrubbing ala iMovie
  if(mouseIsPressed) {
    currentFrame = constrain((frames.length*mouseX)/width,0,frames.length-1);
    timer = 10;
  } else {
    // advance if the timer is done, or decrese the timer
    if(timer == 0)  {
      currentFrame = (currentFrame+1)%frames.length;
      timer = 5;
    }
    else timer--;
  }

  // draw the frame bar
  fill(0); noStroke(); rect(0,height-20,width,20);
  for(var i = 0; i < frames.length; i ++) {
    stroke(128); strokeWeight(3);
    point(width*(i+0.5)/(frames.length),height-10);
  }
  stroke(255);
  point(width*(currentFrame+0.5)/(frames.length),height-10);
}
Interaction
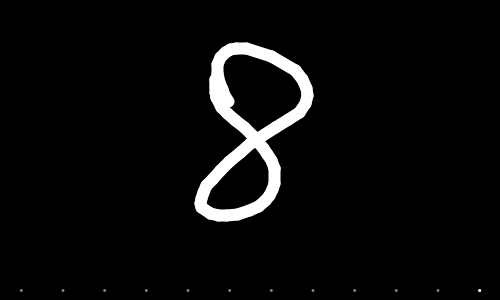
Rather than simply animating a fixed set of images, let us allow the artist to draw the frames interactively. We'll make use of Processing's ability to grab an image from the drawing window, via the get() function, which returns a PImage that we can use just like any other image. Our example will be based on the Processing example Topics | Drawing | Animator. In the following sketch, we can simply scribble with the mouse and an image is captured once in a while. I modify the Processing example a bit to allow the artists to toggle on/off creation and whether the screen of cleared after each frame (keys ' ' and 'c' respectively).
// Based on Processing example Topics | Drawing | Animator

PImage[] frames = new PImage[100];

var create = true;      // drawing or playing back
var currentFrame = 0;       // displayed frame
var numFrames = 0;          // number of frames in the animation
var timer = 0;              // number of frames before the next
var clearFrame = false; // whether to clear every frame

function setup()
{
  createCanvas(500, 300);
  smooth();
  background(0);
  frameRate(60);

  reset();
}

// reset the sketch to contain only an empty frame
function reset() {
  background(0);
  frames[0] = get();
  numFrames = 1;
  currentFrame = 0;
  timer = 30;
}

// advance to the next frame
function advance() {
  currentFrame = (currentFrame+1)%numFrames;
  timer = 10;
}

function draw()
{
  // update the drawing
  if(create) {
    // draw on the sketch
    if(mouseIsPressed) {
      strokeWeight(12); stroke(255);
      line(mouseX,mouseY,pmouseX,pmouseY);
    }
    // if the timer is done
    if(timer == 0) {
      // grab it
      frames[numFrames] = get();
      numFrames++;
      if(clearFrame) background(0);
      advance();
    } else timer--; // decrease the timer
  } else {
    // draw the image
    image(frames[currentFrame],0,0);
    // scrubbing ala iMovie
    if(mouseIsPressed) {
      currentFrame = constrain((numFrames*mouseX)/width,0,numFrames-1);
      timer = 10;
    } else {
      // advance if the timer is done, or decrese the timer
      if(timer == 0) advance();
      else timer--;
    }
  }

  // draw the frame bar
  fill(0); noStroke(); rect(0,height-20,width,20);
  for(var i = 0; i < numFrames; i ++) {
    stroke(128); strokeWeight(3);
    point(width*(i+0.5)/(numFrames),height-10);
  }
  stroke(255);
  point(width*(currentFrame+0.5)/(numFrames),height-10);
}

// used to reseat the sketch
function keyPressed() {
  if(key == ' ') {
    create = !create;
    if(create) reset();
    else advance();
  }
  if(key == 'c') clearFrame = !clearFrame;
}
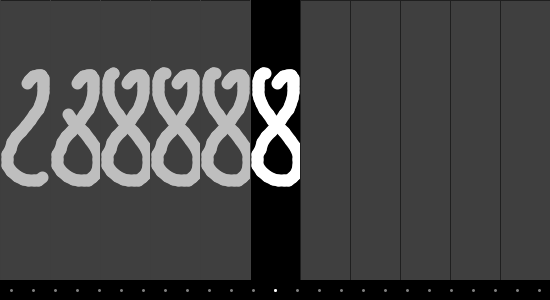
The following sketch displayes the drawn frames side-by-side as we showed before, based on The Reas & Fry Synthesis example "Chronodraw". In our case, you can sketch freely in the current (central) frame.
// Based on Processing example Topics | Drawing | Animator
// and Reas & Fry Synthesis | Chronodraw, by Andreas Gysin (www.ertdfgcvb.ch)

PImage[] frames = new PImage[25];

var create = true;      // drawing or playing back
var currentFrame = 0;       // displayed frame
var numFrames = frames.length; // number of frames in the animation (fixed in this case)
var timer = 0;              // number of frames before the next
var clearFrame = false; // whether to clear every frame

var numStrips = 11;         // number of strips to draw
var stripWidth;             // set later on
var timeBarHeight = 20;     // time bar height

function setup()
{
  createCanvas(550, 300);
  smooth();
  background(0);
  frameRate(60);

  stripWidth = width / numStrips;

  reset();
}

// reset the sketch to contain only an empty frame
function reset() {
  background(0);
  for(var i = 0; i < numFrames; i ++) {
    frames[i] = get((numStrips/2) * stripWidth,0,stripWidth,height);
  }
  currentFrame = 0;
  timer = 30;
}

// advance to the next frame
function advance() {
  if(currentFrame < numFrames-1) currentFrame++;
  timer = 10;
}

function draw()
{
  // draw all other strips
  fill(128); stroke(64); strokeWeight(1);
  for(var i = -numStrips/2; i <= numStrips/2; i ++) {
    if(i == 0) continue;
    rect((i+numStrips/2)*stripWidth,0,stripWidth,height);
    tint(255,128);
    if(i+currentFrame >= 0 && i+currentFrame < numFrames) {
      image(frames[i+currentFrame],(i+numStrips/2)*stripWidth,0);
    }
  }

  // update the drawing for the active strip
  if(create) {
    // draw on the sketch
    if(mouseIsPressed) {
      strokeWeight(12); stroke(255);
      line(mouseX,mouseY,pmouseX,pmouseY);
    }
    // if the timer is done
    if(timer == 0) {
      // grab it
      frames[currentFrame] = get((numStrips/2) * stripWidth,0,stripWidth,height);
      if(clearFrame) { noStroke(); fill(0); rect((numStrips/2) * stripWidth,0,stripWidth,height); }
      advance();
    } else timer--; // decrease the timer
  } else {
    // draw the image
    tint(255);
    image(frames[currentFrame],(numStrips/2) * stripWidth,0);
    // scrubbing ala iMovie
    if(mouseIsPressed) {
      currentFrame = constrain((numFrames*mouseX)/width,0,numFrames-1);
      timer = 10;
    } else {
      // advance if the timer is done, or decrese the timer
      if(timer == 0) advance();
      else timer--;
    }
  }

  // draw the frame bar
  noStroke(); fill(0); rect(0,height-timeBarHeight,width,timeBarHeight);
  for(var i = 0; i < numFrames; i ++) {
    stroke(128); strokeWeight(3);
    point(width*(i+0.5)/(numFrames),height-timeBarHeight/2);
  }
  stroke(255);
  point(width*(currentFrame+0.5)/(numFrames),height-timeBarHeight/2);
}

// used to reseat the sketch
function keyPressed() {
  if(key == ' ') {
    create = !create;
    if(create) reset();
    else { currentFrame = -1; advance(); }
  }
  if(key == 'c') clearFrame = !clearFrame;
}