17. Pixels
Getting pixel values
At the lowest level, images (as well as computer screens) are made up of discrete rectangles called "pixels". If you zoom way in to a picture with an image editor, you can see that. An image of size 800x600 has 800 pixels across by 600 down.
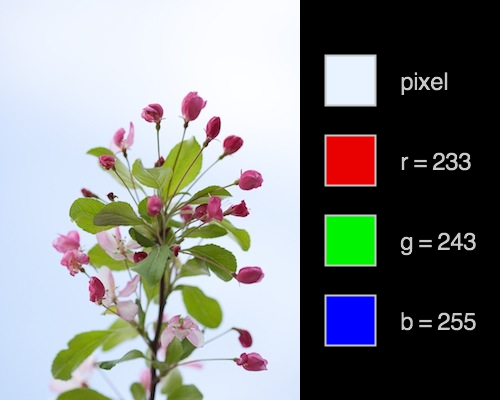
We saw last time how to get() a snapshot of the current window contents, or just a region of it. The get() function can even tell us about a single pixel, when passed x and y coordinates, without a width and height (as needed for a region). It then returns the color of the pixel (instead of an image for the region). We can use the color just like any other color, or extract its red(), green(), and blue() components (floats) with the functions of those names.
Note that in all sketches from now on, I will load a few images that you can swap using the space (' ') key. This is helpful so you can see the effects of the operations we will perform on multiple test cases. Also note that rather than keep indexing into the array, we store the current image into a new object, so we can read the code better.
let img;                    // current image

function setup()
{
  createCanvas(800,400);
  rectMode(CENTER);

  img = loadImage("gullmoon.jpg");
  textSize(24);
}

function draw()
{
  background(0);
  image(img,0,0);  // put it at the corner (doesn't fill whole window)

  // Get the moused-over pixel and extract its r,g,b components
  let pixel = get(mouseX,mouseY);
  let r=red(pixel), g=green(pixel), b=blue(pixel);

  // Display the color on the side
  stroke(200); strokeWeight(2);
  fill(r,g,b);
  rect(img.width+50,height/5,50,50);
  fill(r,0,0);
  rect(img.width+50,2*height/5,50,50);
  fill(0,g,0);
  rect(img.width+50,3*height/5,50,50);
  fill(0,0,b);
  rect(img.width+50,4*height/5,50,50);

  // write the pixel values
  fill(200);
  text("pixel", img.width+100,height/5+10);
  text("r = " + r, img.width+100,2*height/5+10);
  text("g = " + g, img.width+100,3*height/5+10);
  text("b = " + b, img.width+100,4*height/5+10);
}
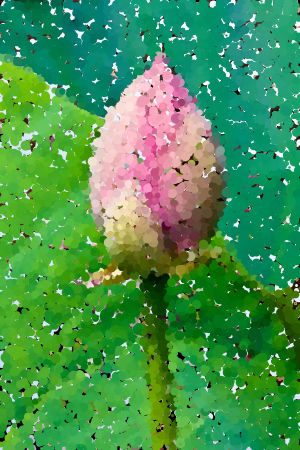
Rather than accessing pixel values from the screen, we can grab them directly from images using the the method img.get() on a image object. But now, rather than exploring the image color, we can use the image as a source of color data for other graphics. For example. we can create painterly renderings using an approach similar to the Processing example Basics | Image | Pointillism.
// Based on Examples | Basic | Pointillism

let imgs = new Array(4); // loaded images
let img;                    // current image
var curImg = 0;                // current image

var numLines=3;     // how many lines per mouse press
var sz=10;          // size of lines
var pt=100;         // how many dits to add every frame

function setup()
{
  createCanvas(300,450);
  smooth();
  noStroke();
  background(0);

  for(var i = 0; i < imgs.length; i ++) imgs[i] = loadImage("img-"+(i+1)+".jpg");
  img = imgs[curImg];
}

function draw()
{
  for(var i = 0; i < pt; i ++) {
    // pick a random position and size
    var x = var(random(img.width));
    var y = var(random(img.height));
    var s = random(2,10);

    // get the color from the image
    let pixel = img.get(x,y);

    // draw a little ellipse
    fill(pixel);
    ellipse(x,y,s,s);
  }
}

function keyPressed() {
  if(key == ' ') {
    curImg = (curImg+1)%imgs.length;
    img = imgs[curImg];
  }
}
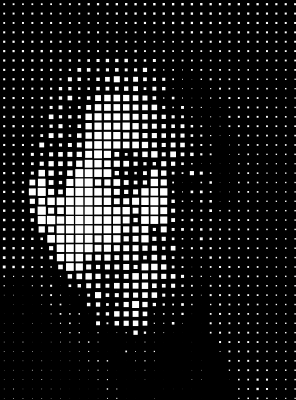
Mosaics
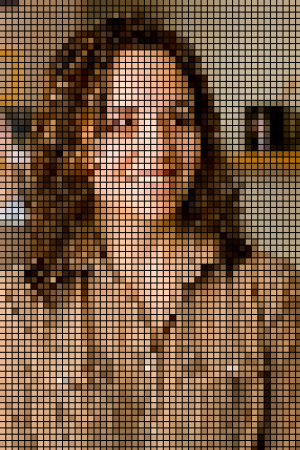
The previous example worked by randomly picking position to draw from and copying the color from the correspnding image pixel. But what if we use a regular structure to place down our "strokes". For example, we could create a grid of little rectangles using loops of loops (as in a previous lecture). This generates a mosaicing effect. Here we use the mouse position to decide the grid size. We have been doing this by hand for quite a bit, so let us take a shortcut now. The map() function converts numerbs from one range to another. In this example, it converts from the range 0-width to the range 2-12, thereby setting the size from the mouseX.
let imgs = new Array(4); // loaded images
let img;                    // current image
var curImg = 0;                // current image

function setup()
{
  createCanvas(300,450);
  smooth();
  background(0);
  rectMode(CENTER);

  for(var i = 0; i < imgs.length; i ++) imgs[i] = loadImage("img-"+(i+1)+".jpg");
  img = imgs[curImg];
}

function draw() {
  background(0);

  // get the tile size
  var s = map(mouseX,0,width,2,12);

  // draw a rect mosaic
  noStroke();
  for (var y = s/2; y < img.height; y += s+1) {
    for (var x = s/2; x < img.width; x += s+1) {
      fill(img.get(var(x),var(y)));
      rect(x,y,s,s);
    }
  }
}

function keyPressed() {
  if(key == ' ') {
    curImg = (curImg+1)%imgs.length;
    img = imgs[curImg];
  }
}
A simple variant of the previous sketch sets the size of the rects, instead of their color, for a black and white mosaic. Note the use of the brightness() function to determine a color brightness.
// Baed on examples by Daniel Shiffman

let imgs = new Array(4); // loaded images
let img;                    // current image
var curImg = 0;                // current image

function setup()
{
  createCanvas(296,400);
  smooth();
  rectMode(CENTER);

  for(var i = 0; i < imgs.length; i ++) imgs[i] = loadImage("img-"+(i+1)+".jpg");
  img = imgs[curImg];
}

function draw() {
  background(0);

  // get the tile size by looking at the color
  var s = map(mouseX,0,width,2,12);

  // draw a rect mosaic
  noStroke();
  for (var y = s/2; y < img.height; y += s+1) {
    for (var x = s/2; x < img.width; x += s+1) {
      color pixel = img.get(var(x),var(y));
      var b = brightness(pixel) / 255.0;
      rect(x,y,s*b,s*b);
    }
  }
}

function keyPressed() {
  if(key == ' ') {
    curImg = (curImg+1)%imgs.length;
    img = imgs[curImg];
  }
}
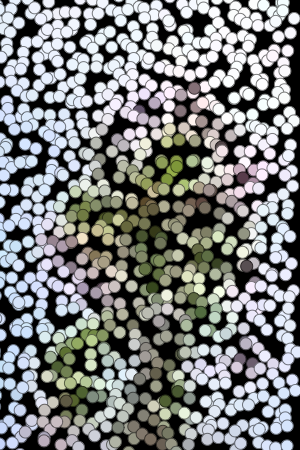
Yet another variant, let us animate an image by creating tons of particles from its colors.
let imgs = new Array(4); // loaded images
let img;                    // current image
let curImg = 0;                // current image

let particles;

function setup()
{
  createCanvas(300,450);
  smooth();

  for(var i = 0; i < imgs.length; i ++) imgs[i] = loadImage("img-"+(i+1)+"-tiny.jpg");
  img = imgs[curImg];

  // start it up
  startParticles();
}

function startParticles() {
  // get the ratio size between the image and the screen
  var r = (0.5*width)/img.width;

  // Create a particle for each pixel
  particles = new Wanderer[img.height*img.width];
  var i = 0;  // which ball to add next
  for (var y=0; y<img.height; y++) {
    for (var x=0; x<img.width; x++) {
      particles[i] = new Wanderer(x*r*2,y*r*2,r,img.get(x,y));
      i++;
    }
  }
}

function draw()
{
  background(0);
  for (var i=0; i<particles.length; i++) particles[i].draw();
  for (var i=0; i<particles.length; i++) particles[i].update();
}

function keyPressed() {
  if(key == ' ') {
    curImg = (curImg+1)%imgs.length;
    img = imgs[curImg];
    startParticles();
  }
}
// A class describing what a Wonderer is, including what he can do
class Wanderer {
  var x, y;    // the position of the Wanderer
  var r;       // the radius of the wonderer
  color c;       // the color of the wonderer

  // Initialize a Wanderer to be at the given coordinates
  Wanderer(var x0, var y0, var r0, color c0)
  {
    x = x0; y = y0; r = r0; c = c0;
  }

  // Draw a Wanderer, wherever it happens to be now
  function draw()
  {
    fill(c);
    stroke(red(c)/2,green(c)/2,blue(c)/2);
    ellipse(x,y,r*2,r*2);
  }

  // Update the state of a Wanderer
  function update()
  {
    x+=random(-r/4,r/4);
    y+=random(-r/4,r/4);
  }
}
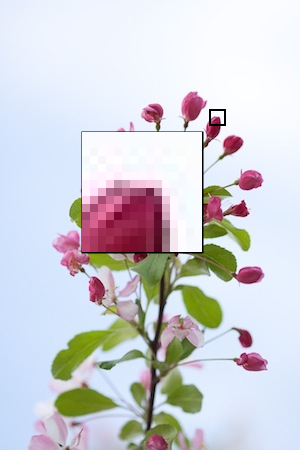
As yet another example, we can leave the background the same, and just magnify a rectangle around where the mouse is. The nested for loops here iterate over offsets from the mouse position. As long as the position plus the offset remains within the image, the pixel color is determined and a rectangle is drawn filled with that color. Each rectangle is the same size, so a rectangle's location is computed by scaling up the offset by that size and adding that to the mouse position.
let imgs = new PImage(4); // loaded images
PImage img;                    // current image
var curImg = 0;                // current image

var numTiles=15;  // number of tiles in magnifying rectangle
var tileSize=8;   // size of a tile in pixels
var offset=75;    // offset between the magnifier and the mouse

function setup()
{
  createCanvas(300,450);
  smooth();
  rectMode(CENTER);

  for(var i = 0; i < imgs.length; i ++) imgs[i] = loadImage("img-"+(i+1)+".jpg");
  img = imgs[curImg];
}

function draw()
{
  background(img);

  // move the lens on the side
  var offsetX, offsetY;
  if(mouseX < width/2) offsetX = offset; else offsetX = -offset;
  if(mouseY < height/2) offsetY = offset; else offsetY = -offset;

  // draw the magnified rectangle and the "lens" rectangle
  stroke(0); noFill(); strokeWeight(2);
  rect(mouseX,mouseY,numTiles,numTiles);
  rect(mouseX+offsetX,mouseY+offsetY,tileSize*numTiles,tileSize*numTiles);

  // magnify rectangle from mouse-magD to mouse+magD
  noStroke();
  for (var y=-numTiles/2; y<=numTiles/2; y++) {
    for (var x=-numTiles/2; x<=numTiles/2; x++) {
      // to be careful, we should make sure to not go out of image bounds
      fill(img.get(mouseX+x,mouseY+y));
      // note the offset to the left or right
      rect(mouseX+offsetX+tileSize*x,mouseY+offsetY+tileSize*y,tileSize,tileSize);
    }
  }
}

function keyPressed() {
  if(key == ' ') {
    curImg = (curImg+1)%imgs.length;
    img = imgs[curImg];
  }
}
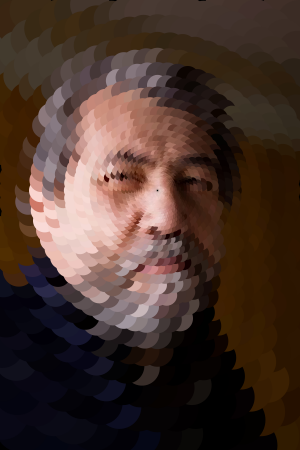
We can get kind of a focusing effect by drawing higher-resolution ellipses nearer the mouse and lower-resolution ones further away. This requires the nested loops to be over the radius and angle, rather than x and y. We move from far out inward to the mouse, so that the closer, smaller ellipses overlay the outer ones. For each radius, we move around the circle. The radial steps are multiplicative, while the circular ones are additive.
let imgs = new Array(4); // loaded images
PImage img;                    // current image
var curImg = 0;                // current image
var maxR;  // how far away can the mouse be from a pixel

function setup()
{
  createCanvas(300,450);
  smooth();
  noStroke();

  for(var i = 0; i < imgs.length; i ++) imgs[i] = loadImage("img-"+(i+1)+".jpg");
  img = imgs[curImg];
  maxR = sqrt(width*width+height+height); // sketch diagonal
}

function draw()
{
  background(0);
  // move from outside in, geometrically
  for (var r=maxR; r>0.01; r*=0.9) {
    // move around circle
    for (var a=0; a<360; a+=5) {
      // convert to (x,y), and plot ellipse if in-bounds
      var x = mouseX + r*cos(radians(a));
      var y = mouseY + r*sin(radians(a));
      if (x > 0 && x < width && y > 0 && y < height) {
        fill(img.get(round(x),round(y)));
        ellipse(x,y,r/5,r/5);
      }
    }
  }
}

function keyPressed() {
  if(key == ' ') {
    curImg = (curImg+1)%imgs.length;
    img = imgs[curImg];
  }
}
Interaction
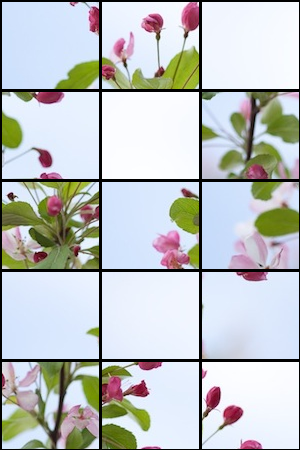
Finally, let's make a very rudimentary puzzle. We use the PImage get() method to extract a grid of rectangular "pieces" from an image. The pieces are stored in an array, such that the pieces on the first row are followed by the pieces on the second row, and so forth. Thus if there are 10 pieces per row, array elements 0-9 are from the first row, 10-19 from the second row, and so forth. Once we have this array, we shuffle it up by swapping each element with some other element (or maybe itself). We then display it by again going through the nested for loops and drawing the piece from the current position in the array. When someone selects two pieces by clicking first on one and then on another, we swap them. Note the formula for going from an (x,y) index in the grid to a single position in the linear array: x+y*nx. As discussed above, if nx=10, then element (2,3) is at 2+3*10, since we have to skip 3 full rows of 10 elements and then take the second element of the next row.
let imgs = new Array(4); // loaded images
PImage img;                    // current image
var curImg = 0;                // current image

let pieces;    // the image fragmented into rectangles
var nx=3, ny=5;   // number of rectangles across and down

var dx,dy;          // rectangle sizes, computed from width,height and nx,ny
var selX=-1,selY=-1;  // if a piece has been selected, its x and y indices (-1 if none)
var auto=false; // whether or not to auto swap pieces

function setup()
{
  createCanvas(300,450);
  noFill(); strokeWeight(3);

  for(var i = 0; i < imgs.length; i ++) imgs[i] = loadImage("img-"+(i+1)+".jpg");
  img = imgs[curImg];

  makePieces();
}

function makePieces() {
  dx=floor(width/nx);
  dy=floor(height/ny);

  // Fragment the image into rectangles, and string them into a line
  // piece 0,0; piece 0,1; ...; piece 0,nx-1; piece 1,0; piece 1,1; ...
  pieces = new PImage[nx*ny];
  var p=0;
  for (var j=0; j<ny; j++) {
    for (var i=0; i<nx; i++) {
      pieces[p] = img.get(dx*i,dy*j,dx,dy);
      p++;
    }
  }

  shuffle();
}

function draw()
{
  if (auto && frameCount % 10 == 0)
    swapPieces(var(random(pieces.length)), var(random(pieces.length)));

  // Draw the pieces at their positions
  var p=0;
  for (var j=0; j<ny; j++) {
    for (var i=0; i<nx; i++) {
      image(pieces[p],dx*i,dy*j);
      // Outline the piece in black
      stroke(0);
      rect(dx*+i,dy*j,dx,dy);
      p++;
    }
  }
  // Outline selected one if needed
  if (selX >= 0 && selY >= 0) {
    stroke(255,0,0);
    rect(dx*selX,dy*selY,dx,dy); // -1 to make sure red can be seen
  }
}

// Mix up all the pieces
function shuffle()
{
  // Swap each piece with some piece later in the array
  for (var i=0; i<pieces.length; i++)
    swapPieces(i, var(random(i,pieces.length)));
}

// Swap the pieces at the two indices
function swapPieces(var i1, var i2)
{
  PImage p1 = pieces[i1];    // remember what's at i1
  pieces[i1] = pieces[i2];   // so that we can put at i1 whatever's at i2
  pieces[i2] = p1;           // and then put at i2 what we remembered
}

function mousePressed()
{
  // Find which piece was clicked on
  var px = mouseX/dx, py = mouseY/dy;
  // Select two pieces to swap; same piece twice to cancel
  if (selX >= 0 && selY >= 0) {
    if (selX == px && selY == py) { // same one twice -- cancel
      selX = -1; selY = -1;
    }
    else { // second selection -- swap
      swapPieces(px+py*nx, selX+selY*nx);
      selX = -1; selY = -1;
    }
  }
  else { // first selection
    selX = px; selY = py;
  }
}

function keyPressed()
{
  if(key == ' ') {
    curImg = (curImg+1)%imgs.length;
    img = imgs[curImg];
    makePieces();
  }
  else if (key == 'a') auto = !auto;
  else if (key == 's') shuffle();
}