Sort Assignment 11 is due next Monday, February 22.
Lab Assignment 5 is due next Wednesday, February 24.
SubsetSumCubeCubeTowerInsane1Insane2Insane3BuriedCountSometimes instead of finding a single path or a single solution we want to find all solutions. A systematic way of doing this is called backtracking. It is a variant of depth-first search on an implicit graph. The typical approach uses recursion. At every choice point, loop through all the choices. For each choice, solve the problem recursively. Succeed if you find a solution; otherwise fail and backtrack to try an alternative.
The basic approach is:
procedure backtrack(partialSolution)

if partialSolution is a complete solution
  print partialSolution or add it to a list of solutions
else
  For all ways to extend partialSolution by one "step"
    expand partialSolution by adding the next "step" to get partialSolution'
    if partialSolution' is valid
      backtrack(partialSolution')
    if necessary restore partialSolution to the state it was in before you updated it
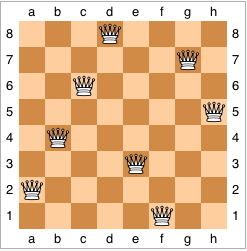
Let's consider the N-queens problem. The goal is to place N queens on an N × N chessboard such that no two queens can capture one another. (Two queens can capture one another if they are in the same row, column, or diagonal.)
A truly brutish brute-force solution technique would be to consider all possible ways of placing N queens on the board, and then checking each configuration. This technique is truly awful, because for an N × N board, there are N2 squares and hence
Another, less brutish, brute-force solution takes advantage of the property that we must have exactly one queen per column. So we can just try all combinations of queens, as long as there's one per column. There are N ways to put a queen in column 1, N ways to put a queen in column 2, and so on, for a total of NN configurations to check. When N = 8, we have reduced the number of configurations to 16,777,216.
We can make our brute-force solution a little better yet. Since no two queens can be in the same row, we can just try all permutations of 1 through N, saying that the first number is the row number for column 1, the second number is the row number for column 2, and so on. Now there are "only" N! configurations, which is 40,320 for N = 8. Of course, for a larger board, N! can be mighty large. In fact, once we get to N = 13, we get that N! equals 6,227,020,800, and so things are worse than the most brutish brute-force solution for N = 8.
So let's be a little smarter. Rather than just blasting out configurations, let's pay attention to what we've done. Start by placing a queen in column 1, row 1. Now we know that we cannot put a queen in column 2, row 1, because the two queens would be in the same row. We also cannot put a queen in column 2, row 2, because the queens would be on the same diagonal. So we place a queen in column 2, row 3. Now we move onto column 3. We cannot put the queen in any of rows 1–4 (think about why not), and so we put the queen in row 5. And so on.
This approach is called pruning. At the kth step, we try to extend the partial solution with k − 1 queens by adding a queen in the kth column in all possible positions. But "possible" now means positions that don't conflict with earlier queen placements. It may be that no choices are possible. In that case, the partial solution cannot be extended. In other words, it's infeasible. And so we backtrack, undoing some choices and trying others.
Why do we call this approach pruning? Because you can view the search as a tree in which the path from the root to any node in the tree represents a partial solution, making a particular choice at each step. When we reject an invalid partial solution, we are lopping off its node and the entire subtree that would go below it, so that we have "pruned" the search tree. Early pruning lops off large subtrees. Effort spent pruning usually (but not always) pays off in the end, because of the exponential growth in number of solutions considered each time a choice is made.
In terms of the pseudocode above, the "all ways to extend a partial solution" consist of all ways to put the queen in the next available column. The "partial solution' is valid" consists of verifying that the queen just placed does not conflict with a queen in an earlier column.
Go through the backtracking for N = 4:
Here is one solution for N = 8, taken from Wikipedia:
We will now look at a program to solve subset sum. We are given a list of positive integers (with no repetitions) and a target number. The goal is to find all subsets of the integers that sum to the target.
So what is a "step"? It is to decide whether to add the next number in the list to the subset or not. So we will make two recursive calls, one where add the next number to the subset and one where we do not. A complete solution is one that sums to the target. A solution is still valid if the sum is at most the target. (Because the integers are all positive there is no way to extend a subset to get a solution if the sum is already too large.) The code for SubsetSum is:
public class SubsetSum {

	/**
	 * Finds all subsets of the numbers in List that add up to target.
	 *
	 * @param numbers  The list of positive integers (cannot have duplicates!)
	 * @param pos      The current position in numbers to be considered
	 * @param subset   The current subset
	 * @param sum      The sum of the integers in subset
	 * @param target   The goal number that the sum should equal
	 */
	public static void findSubsets(List numbers, int pos,
			Set subset, int sum, int target) {
		if(sum == target)
			System.out.println("Subset: " + subset);
		else if(sum < target && pos < numbers.size()) {  // Do nothing if sum too large
			Integer m = numbers.get(pos);
			subset.add(m);
			findSubsets(numbers, pos+1, subset, sum+m, target); // Include pos
			subset.remove(m);

			findSubsets(numbers, pos+1, subset, sum, target);  // Don't include pos
		}
	}
We consider the puzzle called Instant Insanity. It came out well before Rubic's Cube and other really difficult puzzles. The puzzle has four cubes. For each cube each of its six sides is colored red, blue, green, or white. (Show the puzzle.) The puzzle is to make a tower of the cubes by stacking them one on top of another in a way that each side of the tower has each color appearing once.
We use an object-oriented approach to the puzzle. We want an
object type Cube
to hold an individual cube. It holds the colors of the six faces
in instance variables, and allows us to rotate the cube, tip it
90 degrees around the front-back axis so that the top becomes the left
face, and to flip it around the same axis so that the top becomes the
bottm.
Much of the work is done in the class
CubeTower. This object
contains all four cubes. It supplies methods to rotate, flip, and
tip particular cubes and a validity test to see if there are any
conflicts.
The program Insane1
is a really stupid, brute-force way to solve the puzzle. It is clever
enough to note that flipping each piece simultaneously will give another
solution and that rotating the tower, starting with either the original solution
or the flipped solution, will give four solutions each. Therefore it only
places the bottom cube in three positions, one for each top-bottom pair.
The other cubes are each placed in 24 positions. (4 rotations,
flip, 4 rotations, flip back, rotate and tip. Repeat three times. This actually
gets you back to where you started.) There is no pruning.
Only when all 4 cubes are placed do we check for validity. This results
in 43,276 calls to placeCube. Not bad for a computer, but slow by hand.
(Thirty years ago it took a while even on a computer).
Insane2 has the sense to
check for validity of the first k placements before proceeding to placement
k+1. This improves things a whole lot. It results in 1347 validity tests and
58 calls to placeCube. This is not unreasonable to do by hand,
and takes virtually no time on a computer.
Insane3 adds additional pruning.
The idea is that there are partial solutions that have no conflicts on their sides that still
cannot be extended to a complete solution. We would like to prune these, also.
Whenever we place a cube we "bury" its top color and its bottom color, in the sense
that they are no longer available to appear on the sides. If we bury enough occurrances
of a color there will not be 4 copies of that color to appear on all four sides of the
tower, so the partial solution cannot be extended to a complete solution.
Insane3 uses the object
BuriedCount to keep track of
how many of each color have been buried and whether a solution might still be possible.
It allows us to bury and unbury particular colors.
CubeTower has methods to bury and
unbury the top and bottom faces of a cube and to ask BuriedCount
whether a solution is still possible. This reduces the number
of validity tests to 379 and the number of calls to placeCube to 37. For
36 of these calls we bury, unbury, and test whether we have buried too much three times.
This is practical to do by hand.
Note - The idea of this backtracking is simple, but the details of how the cubes are placed and rotated gets complicated. The N-queens backtracking is much simpler. You should not be creating new classes or using data structures beyond an ArrayList and some arrays.
The Maze program is an application, but it has a GUI. So far only applets have used GUIs. It also uses radio buttons, a concept that we have not seen yet. We will now see how to create applications with GUIs as well, and will look at a few more of the dozens of specialized components that are in Swing. Fortunately they all use the same basic way of communicating with your program (listeners), so once you have seen a few it is not hard to pick up new ones as you need them.
In a GUI for an application instead of an Applet window we use a frame. A frame has title bar (including a close box, which we will deal with, and the usual collection of other control boxes, which we will let Java deal with), and a content pane. (It also has other things that we don't need to worry about.)
The first task is to get the frame displayed, and to get it to go away
when we click the "close" box. The main program creates the frame,
but even after the main program is done the frame continues to
run. That's because when we open a frame window, the program
starts a new thread of execution that displays the
GUI. When the main method completes, its main
thread is done, but the thread for the GUI is still running.
Therefore, we need a way to stop the program when the close box is
clicked.
We stop the program as in Fahrenheit.java and FahrenheitGUI.java. We have seen most
of the GUI components—JPanel, JLabel,
and JTextField—before. What's new is the
JFrame. In this example, the FahrenheitGUI
object creates a new JFrame and sets the instance
variable frame to reference it. The constructor includes
the string Temperature Conversion that is displayed in
the frame's title bar.
The way that we indicate that the program gets stopped is with the line
setDefaultCloseOperation says what should happen when
the frame's close button is clicked. Here, we specify that the
program should exit, or terminate.
In this example, the display method of
FahrenheitGUI calls frame.pack and
frame.setVisible(true). The pack method
sizes the frame to fit the components that have been added into it,
and the setVisible method with a parameter of
true tells the frame to actually display itself on the
screen. You should call pack on a JFrame
if the setSize method has not been called on the
JFrame to set its size. In this example, we have called
setPreferredSize on a JPanel that is added
to the JFrame, but we have not called
setSize on the JFrame itself. The
pack method of JFrame has the
JFrame set its size to fit around the GUI components
within the frame.
JPanel both for drawing and as a container
for grouping buttons, check boxes, or other components together. We
will add JPanel objects to a frame or to another
container. You can build a whole hierarchy of components by
assembling JPanels, getting a lot of control over the
layout. When components are added to a JPanel they use a
Flow Layout by default. We'll see later how to use a different layout
manager for a JPanel.
As with the JApplet objects we saw earlier, we do not add
components directly to a JFrame. A frame has a number of
panes, one of which is the content pane. Therefore when adding
components to a frame, we write
contentPane. Or, as in
the constructor for FahrenheitGUI, we don't bother
storing the result of getContentPane in a variable.
The content pane of an application uses a different layout scheme called Border Layout. We saw this before in PS-3, although we did not require you to program with it. The pane is partitioned into five regions: North, South, East, West, and Center. They appear in the pane as follows:
You can add at most one component to any one of these regions. Regions with no component are taken over by the Center region, which expands to fill the leftover area. We'll see that the North and South regions expand horizontally in ways that are sometimes a bit strange.
We can arrange the layout of a GUI using the content pane and as many
JPanels as we like.
ButtonTest.javaJPanel objects: the program ButtonTest.java. When running it, we can
see that it has four buttons across the bottom and a large content
pane where a rectangle can be moved via button clicks. Try it out.
We will see how to set up this GUI.
First, consider the main program. It is similar to the
frame example we looked at earlier. The only differences are that it
uses frame.setTitle to set the title here rather than
doing it in the frame's constructor, and we call setSize
on the frame, thus obviating the need to call pack.
The real work of setting up the GUI is in ButtonFrame.java. The
ButtonFrame class has five private instance variables:
JButtons to hold the buttons, and
RectanglePanel, which inherits from
JPanel. This is a panel on which we draw the
moving rectangle.
In the constructor for ButtonFrame, we make sure that the
program will stop when the window is closed by calling
setDefaultCloseOperation(JFrame.EXIT_ON_CLOSE).
The ButtonFrameconstructor then assigns the instance
variable rectPanel to a new RectanglePanel.
It also creates the JPanel buttonPanel to group the
buttons together. This variable is local, because we do not need it
after the constructor is done. The buttons themselves are needed
after the constructor finishes, but the panel that groups them is not.
All four buttons are created, with labels Up,
Down, Left, and Right. Unlike
the GUI in Lab Assignment 3, all four buttons are assigned the same
listener object. We will see later how we can do different things in
the method, depending on which button was pushed.
All we have done so far is create some objects. We have yet to place
them into the frame. That's what happens next. The program gets the
contentPane from the frame and adds
rectPanel, the drawing area, to the center region of the
contentPane using the builtin constant
BorderLayout.CENTER. (Alternatively, you can instead use
the string "Center" as the second parameter to
add.)
We want all four buttons in the South area of the frame. With the
variable layoutStyle set to the value
flowLayout (from the enumerated type
LayoutType), we first add all four to the
JFrame buttonPanel (using Flow Layout) and then add
buttonPanel to the south part of the
contentPane.
The method actionPerformed in
DirectionListener responds to the button clicks. The
ActionEvent event has within it a reference to the object
that is the source of the event. A call to
event.getSource returns this reference. By comparing
references we can decide which button was clicked in a series
of if-else statements. Then each of them moves the rectangle in the
rectPanel in a different direction by calling the
moveRectangle method of RectanglePanel with
the appropriate parameter values. After moving the rectangle,
actionPerformed has the RectanglePanel draw
itself.
What remains is the RectanglePanel class in RectanglePanel.java. This is the panel
for the drawing area. Therefore it has the methods to deal with
drawing on the panel (paintComponent) and the information
about what is to be drawn there.
It has a private instance variable theRect, which
references the Rect object to be drawn. We've seen the
Rect class, in Rect.java, before.
The rectangle is initialized in the constructor to be at the upper
left-hand corner of the panel. Each panel has its own coordinate
system.
To draw we call paintComponent.
Important note: the first line of paintComponent
should always be a call to super.paintComponent.
Doing so gives the superclass method a chance to do what it needs to
do with the panel.
Then it can do what we normally want. In this case, it draws
theRect and then draws a grid of light grey lines in
multiples of the rectangle size. The calls to getWidth
and getHeight are actually calling methods inherited from
JPanel; these calls return the width and height of the
panel, so that we draw the grey lines at the correct lengths.
Another method is moveRectangle. It simply shifts the
rectangle by dx rectangle widths in the x
direction and dy rectangle heights in the y
direction. Remember that the actionPerformed method
called it to move the rectangle in response to button pushes.
The last method in RectanglePanel is draw,
which just calls repaint. Strictly speaking, we didn't
need to define draw in RectanglePanel.
Instead, we could have replaced the call rectPanel.draw()
in the actionPerformed method of ButtonFrame
by the call rectPanel.repaint(). I chose to define and
call the draw method because it is cleaner to hide that
rectPanel has a repaint method from the
classes that use it. In fact, just calling repaint here
would also work.
Up button
on the top, the Left button on the left, the
Right button on the right, and the Down
button on the bottom. Setting the variable layoutStyle
to wideBorderLayout gets us closer.
Now our button layout is accomplished by the lines
Up
button on the North side, the Down button on the South
side, the Left button on the West side, and the
Right button on the East side. The only aesthetic
problem is that with Border Layout, the North and South borders
stretch the entire horizontal span of the panel, so that the
Up and Down buttons appear much, much wider
than the Left and Right buttons.
We can solve that problem, too. If we set variable
layoutStyle to niceBorderLayout, we run the
lines
JPanel objects, referenced by
northPanel and southPanel, each holding just
one JButton. By putting upButton and
downButton each in its own little JPanel, we
prevent these buttons from being stretched horizontally in a Border
Layout.
JCheckBox class.
JRadioButton class.
JComboBox class.
At this point, many of the features of this program are probably self-explanatory. Some are not. We'll go through a few of them here.
The heavy lifting is done in ChoiceFrame.java. The
ChoiceFrame constructor builds the GUI. As usual, we
attach a listener to each button or combo box. As in the
ButtonFrame class in ButtonFrame.java, we use one listener for
all choice components. This listener's actionPerformed
method calls the method setSampleFont, which gets the
value of each choice component and then displays the sample text
according to these values.
When constructing the JTextField referenced by
sampleField, we specify a text string to display. We
also set the editability of this text field to false, so
that the user cannot edit it. The editability can be changed,
however, as we shall see.
All check boxes, from the Swing class JCheckBox, may be
turned on and off individually. We use them for independent choices.
Here, we have three check boxes:
editableCheckBox, which the user can click to make
the text field editable.
italicCheckBox, which specifies that the text is
to be displayed in italics.
boldCheckBox, which specifies that the text is to
be displayed in boldface.
isSelected method. The setSampleFont method
makes calls such as editableCheckBox.isSelected() and
italicCheckBox.isSelected().
A combo box lets the user pick one of a list of items. Here, the items are font names. When one is chosen, an action event occurs, which is handled by the listener we attach to the combo box. Because we set the combo box to be editable, the user can type in other font names, too.
We use radio buttons to select the font size: small, medium, or large.
Radio buttons allow the user to make exactly one choice out of a set
of choices. The way we indicate each set of choices is with
ButtonGroup objects. We create a new
ButtonGroup for each set of choices, and we add the
buttons to the ButtonGroup. A ButtonGroup
has nothing to do with the layout of the buttons on the screen; it
makes it so that when the user clicks one button of a set, Swing knows
which other buttons have to become unselected. (It takes care of
unselecting them.) We choose to start out with one radio button
being selected - if we did not none would be selected.
Here, we choose the one for the large text size.
We can also add tool tips to our check boxes and radio buttons. By
calling the setToolTipText method on a GUI component, we
give text that will appear when the cursor is held over the component.
This method applies to pretty much any GUI component, including combo
boxes.
That takes care of setting up the objects. Next is the physical
layout. We make a JPanel named sampleFrame,
with Border Layout, to hold editableCheckBox and
sampleField, with the check box above the text field. By
adding sampleField to the center region of the Border
Layout, we make it so that when the window is resized, the sample
text's panel grows and shrinks to fit the window. We then make a
panel for the font name combo box. Next, a panel for the size radio
buttons. We put the title "Size" and an etched border around this
panel. Similarly, we make a panel for the style check boxes, with the
title "Style" and an etched border.
The latter three panels—for the font name combo box, size radio
buttons, and style radio buttons—are aligned vertically using a
new layout manager: the Box Layout manager. A Box Layout allows us to
align components either vertically or horizontally. Unlike the other
layout managers, a BoxLayout constructor takes as a
parameter a reference to the component that it is laying out. I don't
know why. But it means that if you were using a Box Layout to lay out
more than one component, you would have to create a new
BoxLayout object for each one. Here, the component that
the Box Layout manager is working on is southPanel.
The two panels that we have yet to place into a
container—sampleFrame and
southPanel—are put into the content pane. Recall
that in an application, the content panel by default uses Border
Layout. Again, by putting the panel containing the sample text in the
center region, the sample text's panel will grow and shrink as the
window is resized.
Finally, the ChoiceFrame constructor calls
setSampleFont to get the values of all the GUI components
and redisplay the sample text. The setSampleFont method
asks whether each check box and radio button is selected, doing the
appropriate thing for each component that is selected. The call
fontnameCombo.getSelectedItem() returns what appears in
the combo box. Here, we cast it to a String, which is
what we'll be using.
The style is an integer that we set according to the check boxes. It
starts as a 0, indicating "plain," and we add into it according to
other styles that we want. Font.ITALIC and
Font.BOLD are constants that indicate the styles used
here. We set the font size according to which of the radio buttons is
selected.
Once we have the font name, style, and size, we call the
setFont method on sampleField with the font
name, style, and size. This call changes some of the text field's
display characteristics. A call to sampleField.repaint
causes the text field to actually redisplay.
Given this we can see how the maze program is laid out. The top level MazeSolver.java simply creates the maze frame, sets its size and title, and makes it visible.
The work is done in MazeFrame.java.
This sets up the frame and the buttons. Note that the stepButton,
clearButton,
and readButton are local variables. That is because once they are
registered with a listener nothing more needs to be done with them. The
solveButton has to change its text (alternates between "Solve" and
"Pause") and the radio buttons need to be tested to see which is selected.
Therefore they are instance variables. The button layouts are very similar
to ones we have seen before, so I will let you read them on your own.
The listeners are worth looking at. The StepListener does
the work of actually performing a step in the maze. It is used by both the
Timer and the stepButton. If the maze is solved
it turns off the timer and sets the label on the solveButton to
Solve. If not, it calls maze.stepMaze() to do one more step
in solving the maze.
SolveListener is
used to handle the solveButton. It toggles the label on the
button and the state of the timer (if on, then turns it off, and vise versa).
The ReadListener reads a new maze and creates it. The
RadioListener creates a new maze, with createMaze
looking at the radio buttons. Creating a new maze is what we want to do
when we clear the maze, so this works for the clearButton also.
The createMaze method sets up a new maze. It creates the
correct type of sequencer. (Remember a sequencer is basically an abstract queue -
it can add items and get the next item.) It makes a maze from the text representation
that has been read in (or does nothing if no text has been read or it has an error).
It passes this maze on to the mazeCanvas and repaints.
The mazeCanvas holds a MazePanel.java,
which basically draws the current maze. The code for display figures out
the square size and the position of the upper left hand corner, and it draws each square
in the appropriate color.
Maze.java both initializes the maze in its
constructor and performs a step of solving the maze in stepMaze.
Method stepMaze is where the virutal graph is explored. It calls the
current sequencer to get the next
maze square to be processed. If the square to be processed is the target it traces back the path,
marking each square as on the final path. If not, and the square was not explored,
it tries to add each of its four potential
neighbors to the sequencer (if they exist and are either empty or the target) and marks
the current square as explored. This will prevent it from being explored again later.
The actual code for solving the maze would have been simpler if we were not creating an interactive GUI. The GUI requires spreading the solution out, separating out the code for taking a step and making it act on the current "state" of the maze. This step code would normally be part of a loop. But here the loop is provided by the GUI, either via the Step button or repeated calls from the Timer after clicking Solve.