
A quality 3d project almost always starts with some good planning. For a 3d hand model, it is a good idea to plan out how we want the wireframe mesh to wrap around our model. In doing this, we should keep in mind the future needs of the model in terms of animation and texturing, in order to simplify those steps before we even get to them.
In the specific case of a hand, we should be extra careful to create geometry that will respond well to the skeletal structure that we plan for it. Adding extra segments near joints is a good idea in order to keep joints well defined during deformations. Being careful to arrange the wireframe in a way that limits any sort of creasing from skeletal deformations should also be a priority. Streaked textures, rubbery bone deformations, strange creases and artifacts, all these things can be minimized with proper planning and preparation.
A good way to plan this model, is to simply use the one you have. Yes, your hands; draw on them! if you have an eye for physical proportions and traditional drawing skills, sketch out a hand from above and below and then add in some reference points and lines to help out with the modeling process. I chose to draw some guides (rough polygonal outlines, and some tickmarks) on my hand, place my hand on a scanner, and use this as background images in lightwave modeler. The image is provided for you below, if you choose to use mine.

I didnt scan in the sides or top view, only the bottom view, and then I decided to wing it. I was comfortable enough to look out for tricky situations in those areas as I went along. If you need the extra planning, then by all means scan in the top view as well. If you are making your own it would probably be a good idea to go into photoshop in order to get the right contrast level. When you are there, convert the image to a grayscale png (thats my favorite, but you are free to use whatever) since the background image in lightwave will be back and white anyway.
To set the image as the background, go to the display panel (d), click on the backdrop tab, and from the image pulldown load your image. Maintaining aspect ratio, change the size to about 210mm.
Now that we have the basic contour of our palm, we will move on to adding a finger. I chose the middle finger since it is a good average in size of all the other fingers, therefore making it easier to modify into a thumb or pinky later on.
Add two points above the edge of the opening to the middle finger, about 2.5cm above our palm. select all 6 of the points forming the opening to of the middle finger and make a polygon (p). smooth shift (F), or bevel (b), this polygon out the length of a whole finger based on your background image. using the knife tool (K), divide the finger into sections. Follow the tickmarks on the background image as a reference for how many and where knife operations are needed. Leave the tip of the finger as it is for now. After some dragging and tweaking, your finger should look like this:

Extend the tip of the finger two more times using the bevel (b) or smooth shift tool (F). arrange the points as they are show below, this will require some careful dragging operations.

Subdivide the two polygons so that they are made of a pattern of 4 quads (figure 5). To do this, create two point (+), create some new polygons from scratch, and then delete the old nail bed. select the four polygons and give them a nail surface (q).
Smooth shift the nail polygons once with negative shift and positive inset (figure 6), and then again with a positive shift, and negative inset (figure 7). Play around with different settings to get a good looking nail. Tweaking with the drag tool (alt + t) can also be useful. Extend the uppermost nail polygon forward to define the french tip.


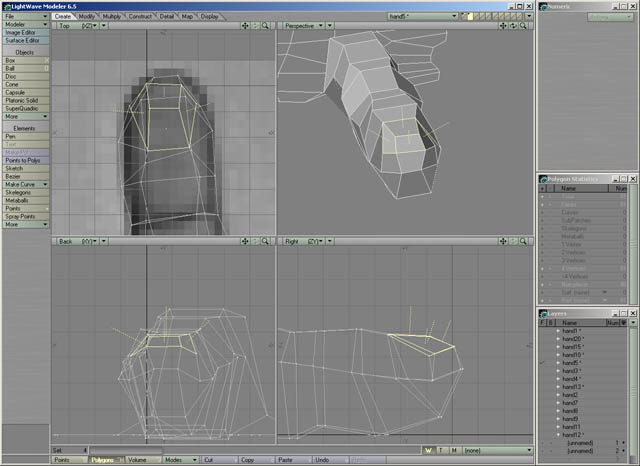
Now that we have our background image scanned in and set up in modeler, it is time to start tracing it.
If your planning was very detailed, then most of this tutorial will simply involve tracing your wireframe from the scan. I was not that detailed in mine. My reference image only has some muscle contours and some tickmarks, so I had to figure out a good way to lay down the polygons. In order to create the intricate pattern of polygons seen below, we can use a number of methods. We can either, create points (+) for all the intersections, and then go back and select sets of 4 points to make quads out of them (p). Or you could try to experiment with the pen tool to create these. I used the first method:

Take note that we should keep the number of points that define the opening to each finger the same, so that we can use a modified version of the same finger to model each. Here, the index and pinky have one less point on their edges, but those will be added later.
Also notice the well placed triangle shaped quads in between the fingers. These will assist us later in extruding the fingers. They increase the number of edge we will have to work with for the fingers, helping prepare enough geometry for the road to come.
We now have a palm with an index finger. We will clone this finger 4 times in order to get the other 3 digits.
Select all the geometry of the middle finger, and copy it to the next layer. Do this 3 more times. starting with the second layer, set the background layer to layer 1. Using the existing hand geometry and the background image as reference, position the cloned finger in the place of the index finger. Stretch and rotate the finger to more closely match the orientation of the new position and then start to tweak it with the drag tool.

Repeat this process with the other fingers. All the fingers should be then welded to the hand. Each finger opening should have the proper amount of points to allow you to simply weld the closest pairs of points together. If you did not plan ahead, then you will need to do some clever polygon work.

The knuckles are a tricky but important part of the hand. To create knuckles that both, look realistic and animate well with bones, we will use the spiderweb pattern shown below. Create this set of polygons for one finger, and then copy and modify it over to the other fingers. take special note of the diamond shaped quads placed between the fingers. These help fade away the slight webbing between the fingers. Your finished knuckles and fingers will look like figure 10.

We have all the four fingers now, but what about the thumb? that what we'll be making our way towards now, by fleshing out the upper side of the hand.
First we will extend the palm geometry up in two segments to meet the upper side of the hand. using point extender, or a similar method, extend the outer edge of the palm and drag these points up. Weld corresponding points and extend again. You should be left with something similar to figure 11.

Now start extending from the edge of the knuckles backwards. These three additional segments will bring us to the thumb. Fill in any extra gaps between the top and bottom and youll end up with figure 12.

Since we now have the opening to the thumb complete, we can repeat the process we performed to clone the fingers, in order to model the thumb. The thumb will take extra work as we have to enlarge it quite a bit, and squish its length. After welding the thumb in place, your hand will look like this:

Wow, we are almost done! all five digits, and not much more to go. Only minor details and tweaking.
Extend the already existing geometry to flesh out the rest of the upper side of the hand. From there we will extend again to give some definition to a wrist, leaving us with figure 14.

All that is left is some tweaking. This stage is very important. I suggest you spend a good deal of time doing this in order to perfect the geometry present. Dragging points in and out, while switching between polygon and subpatch modes. Some good tweaking will hopefully leave you with a satisfying result.

disclaimer: This tutorial outlined the steps I took in creating the hands for my 3d characters. The technique used is based largely on the way I modeled the feet using a great tutorial written by rick suchy. I strongly suggest you check it out.